
GeoLiteCity 找尋來源IP地理位置
有時候會想知道服務的訪客都來自哪些國家,剛好 Graylog 有提供 GeoIP 解析功能,可以查看連線來源的國家與城市。資料庫使用 MaxMind 免費提供的 GeoLite2,分為國家(Country)、城市(City)及 ASN 三種,這裡下載的是城市資料庫。
2020.01.10
檢查功能是否正常運作時,發現無法下載新版資料庫。到官網查看才知道已經不再公開下載,必須先註冊帳號才能下載最新的資料庫。
2024.07.14
修改流程及更版設定畫面資訊
2026.11.03
更新 MaxMind 註冊流程畫面;調整設定順序(先下載資料庫再設定 Graylog);補充 GeoIP.conf 設定、檔案權限與套件升級注意事項
運行環境
- 系統環境:Rocky Linux、Debian / Ubuntu
- 資料庫:MaxMind GeoLite2 City、GeoLite2 ASN
前置需求
- MaxMind 帳號與 License Key(申請方式見流程一)
- Graylog 主機可對外連線 DNS 與 HTTPS 443,用來下載資料庫(封閉網路或走 Proxy 的環境須另開白名單,見官方說明)
設定流程
流程一:註冊 MaxMind 帳號並產生 License Key
-
到官方網站註冊一個免費帳號,註冊完成並登入後,就能看到下載與金鑰管理的功能。
-
點選畫面右上角的登入

- 註冊帳號
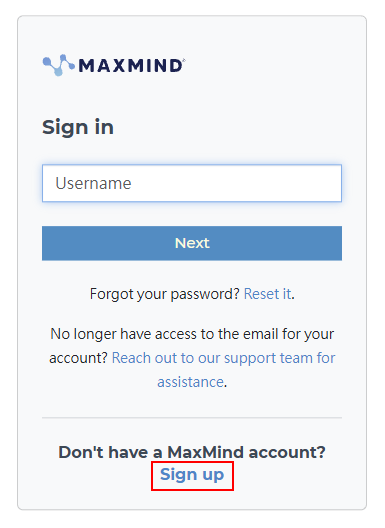
- 填寫註冊資訊

-
送出後會收到官方寄來的郵件,請依郵件指示完成後續操作
-
登入後點選圖片中的
GeoLite
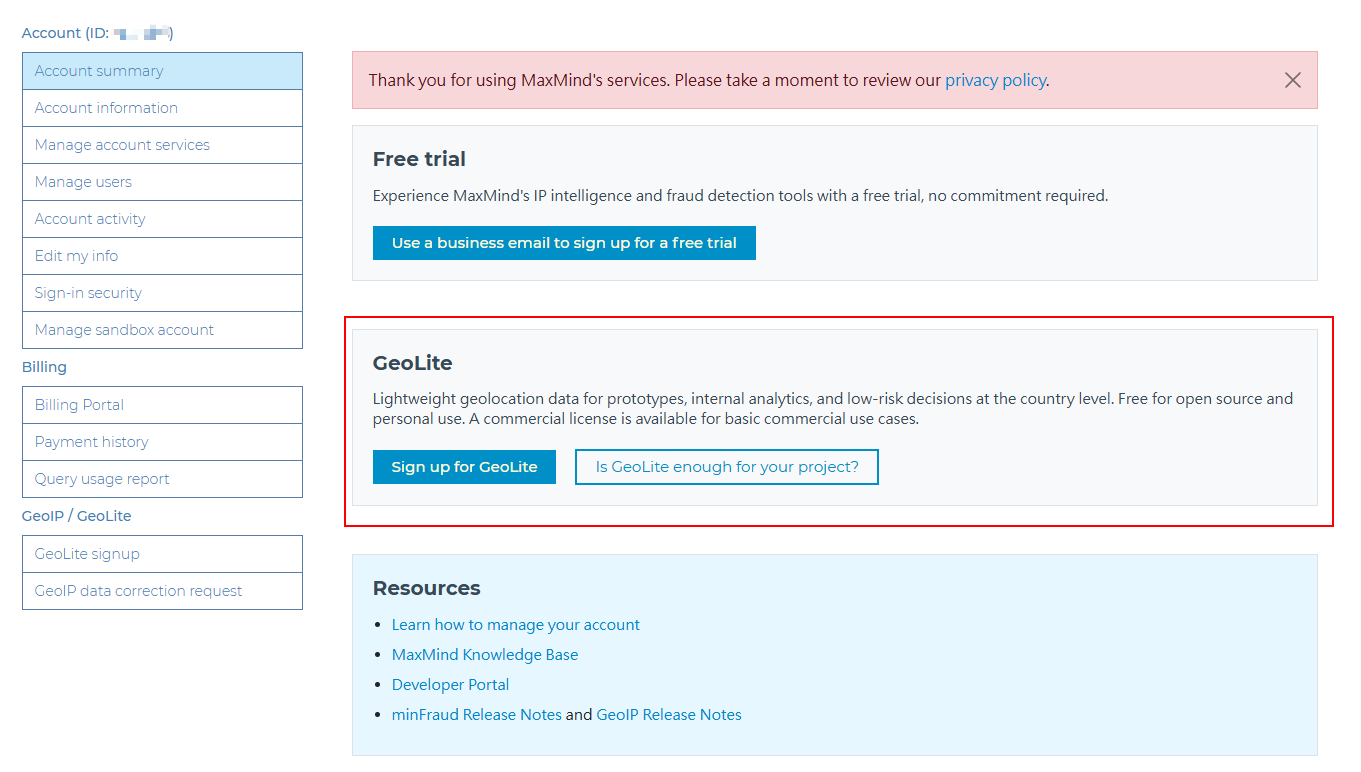
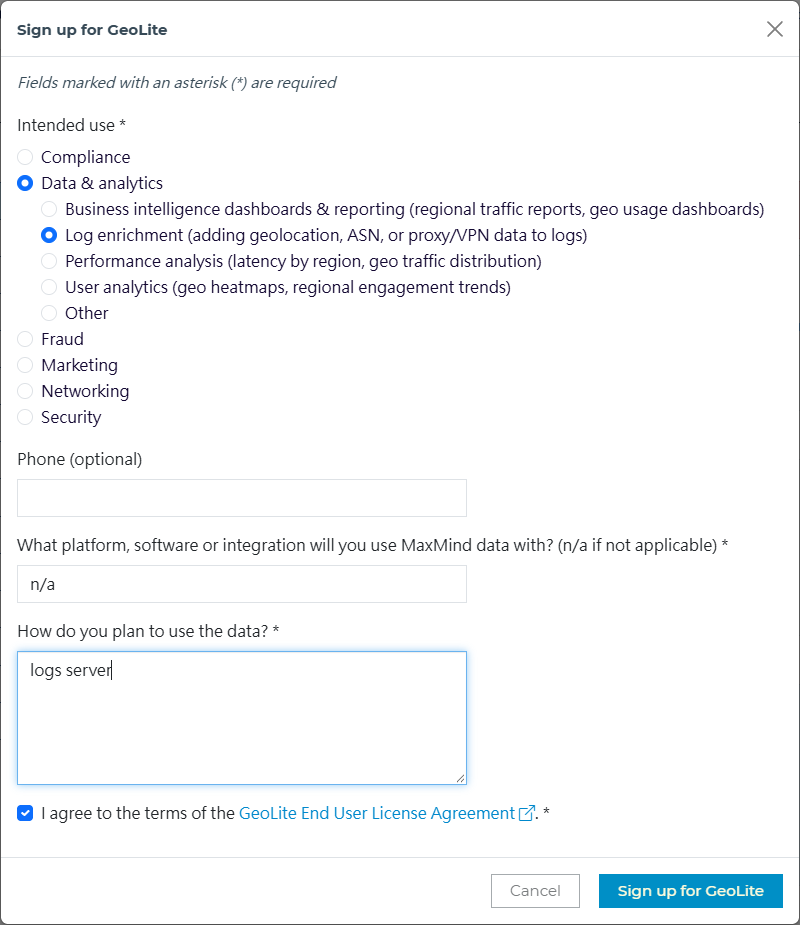
- 回答官方提出的問題,圖片中的內容僅供參考
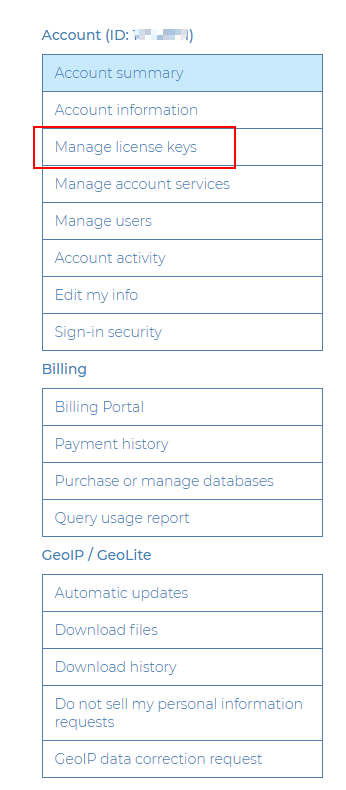
- 在左側選單的
Account類別中,點選Manage license keys
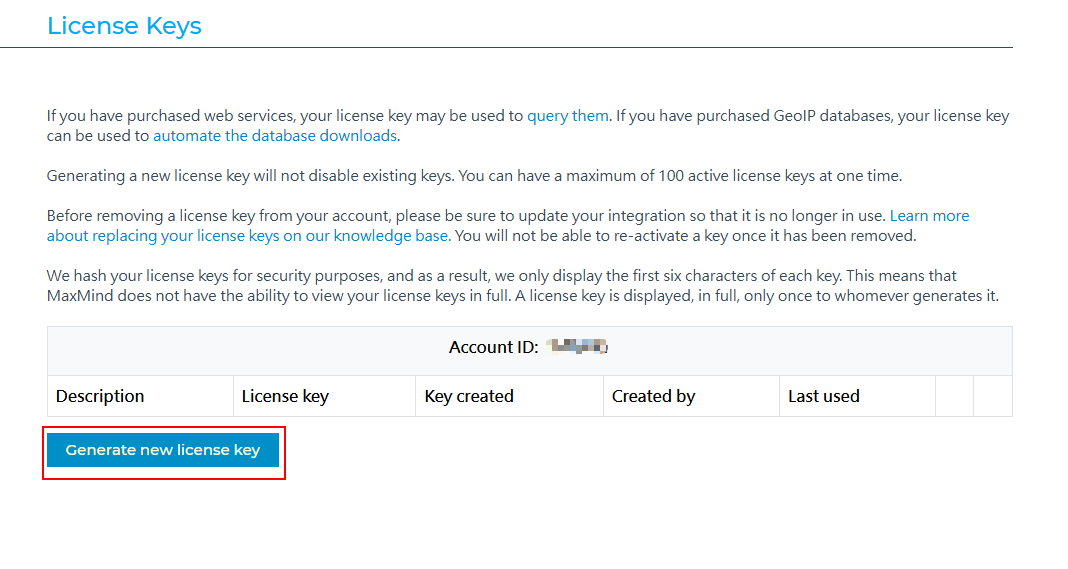
- 建立新的 License Key
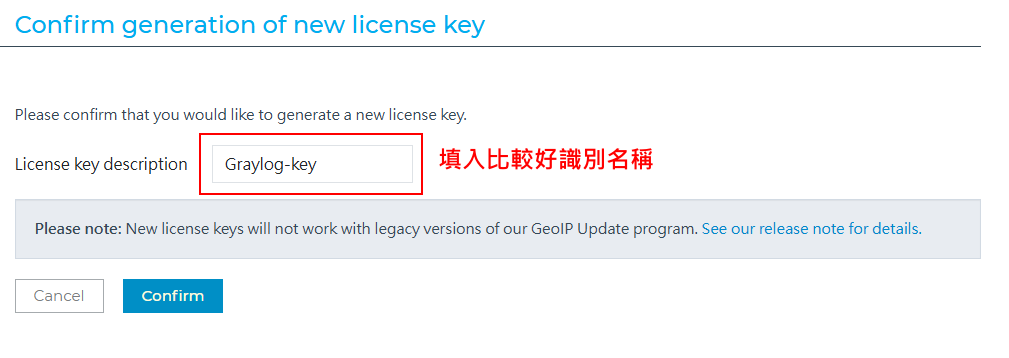
- 名稱建議填入使用這把金鑰的服務,方便日後辨識
- 下載剛剛產生的設定檔
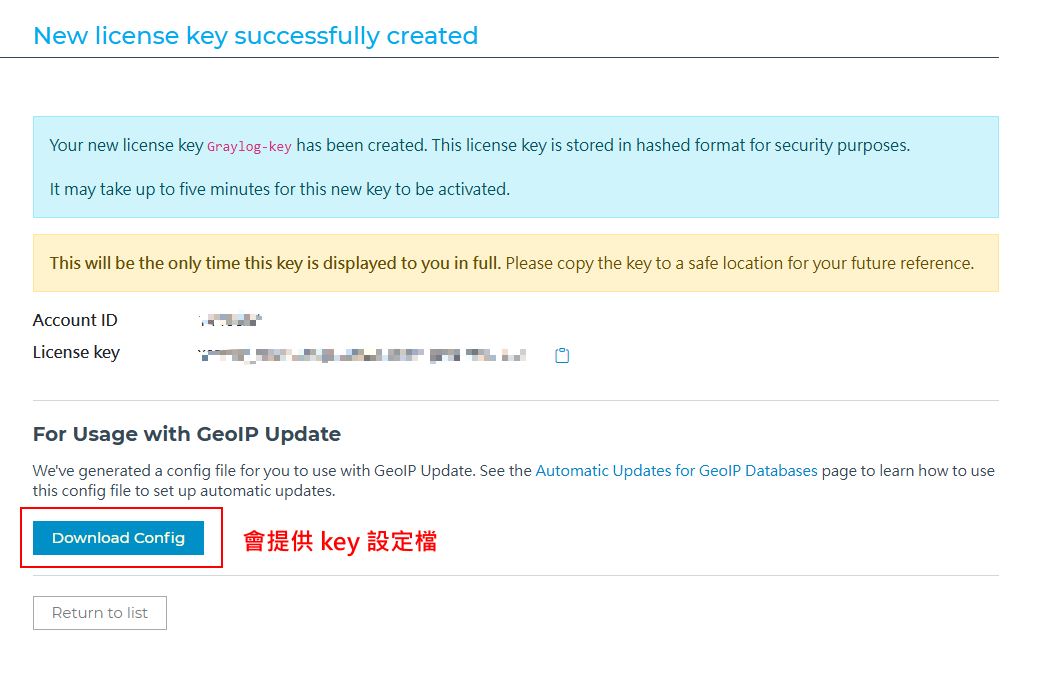
完整的 License Key 只會在建立時顯示一次,請妥善保存。若金鑰曾出現在截圖或公開文件中(即使已打馬賽克),建議到 Manage license keys 撤銷後重新產生。
流程二:安裝 geoipupdate 並下載資料庫
自動更新 GeoIP 資料庫
官方政策調整後不再公開提供下載,必須註冊帳號並使用 License Key 才能下載(官方公告),因此改用官方的 geoipupdate 工具自動更新。
Graylog 在啟用 Geo-Location Processor 並儲存設定時,會檢查資料庫檔案是否存在。請先完成本流程、確認資料庫已下載,再進行流程三的 Graylog 設定。
安裝前請先確認系統是否已安裝舊版的 GeoIP 與 geoipupdate 套件。若已安裝,安裝時會出現檔案衝突而失敗,請先移除這兩個套件再安裝(錯誤訊息與處理方式見「疑難排解」)。
- 到 GeoIP Update Releases 查詢最新版號,下載套件(以下以
VER變數代入版號,請改成 Releases 頁面上的最新版)
VER=8.0.0

# Rocky Linux
wget https://github.com/maxmind/geoipupdate/releases/download/v${VER}/geoipupdate_${VER}_linux_amd64.rpm

# Debian / Ubuntu
wget https://github.com/maxmind/geoipupdate/releases/download/v${VER}/geoipupdate_${VER}_linux_amd64.deb
- 安裝套件
# Rocky Linux
rpm -i geoipupdate_${VER}_linux_amd64.rpm

# Debian / Ubuntu
dpkg -i geoipupdate_${VER}_linux_amd64.deb
- 編輯設定檔
vim /etc/GeoIP.conf
# 帳號 ID 與 License Key 可在 MaxMind 後台的 Manage license keys 頁面取得
AccountID 輸入 MaxMind 提供的帳號 ID
LicenseKey 輸入剛剛產生的 License Key

# 要下載的資料庫(Graylog 使用 City 與 ASN 兩種)
EditionIDs GeoLite2-City GeoLite2-ASN

# 資料庫存放路徑
DatabaseDirectory /etc/graylog/server
- 設定檔內含 License Key,預設權限任何帳號都能讀取,建議限制為只有 root 可讀
chmod 600 /etc/GeoIP.conf
- 手動執行第一次更新,並確認資料庫已下載、且 Graylog 帳號可以讀取
/usr/bin/geoipupdate -v
ls -l /etc/graylog/server/*.mmdb
- 設定排程更新
crontab -e(官方建議每週至少更新兩次,以下為每週三、六早上 7:30)
30 7 * * 3,6 /usr/bin/geoipupdate
流程三:Graylog 啟用 Geo-Location Processor
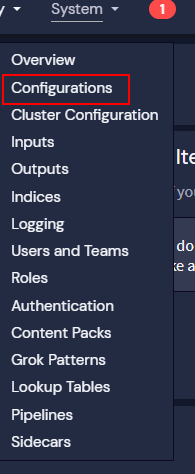
- 登入 Graylog,點選上方選單
System→Configurations
- 在
Plugins分類中點選Geo-Location Processor,按下Edit configuration
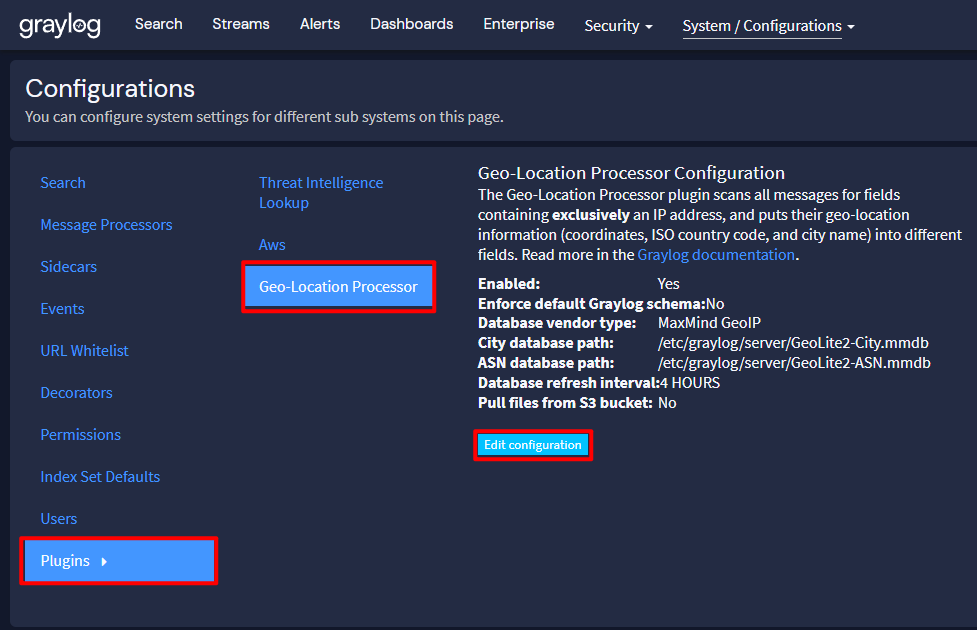
- 勾選啟用,確認資料庫路徑後儲存設定
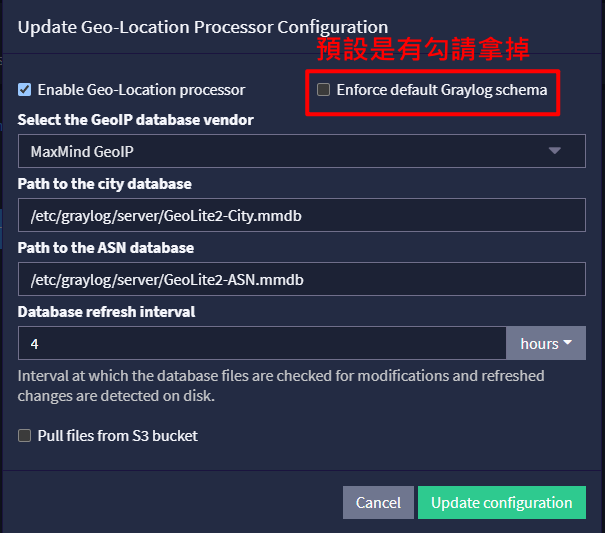
Enable Geo-Location processor:勾選啟用(預設不啟用)Enforce default Graylog schema:勾選時只解析 Graylog 標準欄位(如source_ip、destination_ip);取消勾選則會解析所有含公開 IP 的欄位,並加上_geolocation、_country_code、_city_name等後綴欄位- City/ASN 資料庫路徑:
/etc/graylog/server/GeoLite2-City.mmdb、/etc/graylog/server/GeoLite2-ASN.mmdb,須與GeoIP.conf的DatabaseDirectory一致 Refresh interval:檢查資料庫檔案是否更新的間隔。geoipupdate 更新資料庫後,Graylog 會在這個間隔內自動重新載入,不需要重新啟動
私有及保留位址(例如 10.x.x.x、192.168.x.x)不會被解析出地理位置。
流程四:調整 Message Processors 順序
- 在右側選單選擇
Message Processors
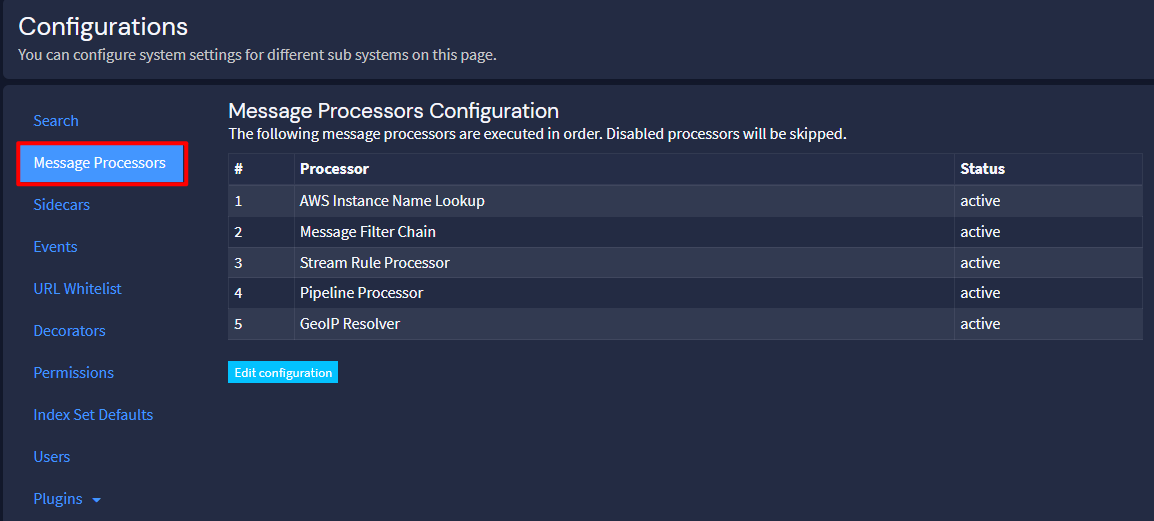
- 按下
Edit configuration,將GeoIP Resolver拖曳到最下面後按Update configuration儲存,儲存後清單中的GeoIP Resolver應排在最後一位(如上一張圖)
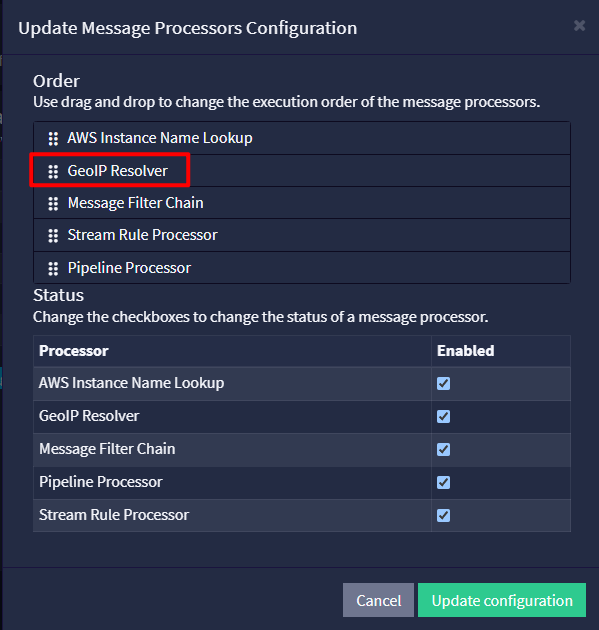
放在最下面的好處是 Extractor 或 Pipeline 解析出來的 IP 欄位也能被查詢地理位置;代價是 Pipeline 規則裡看不到 GeoIP 產生的欄位。若 Pipeline 需要用到地理位置欄位,請把 GeoIP Resolver 排在 Pipeline Processor 之前。
補充說明
geoipupdate 套件更新
- 到官方 GitHub 下載新版本,
VER請改成要更新的版號
VER=8.0.0

# Rocky Linux
wget https://github.com/maxmind/geoipupdate/releases/download/v${VER}/geoipupdate_${VER}_linux_amd64.rpm

# Debian / Ubuntu
wget https://github.com/maxmind/geoipupdate/releases/download/v${VER}/geoipupdate_${VER}_linux_amd64.deb
升級套件時,已修改過的 /etc/GeoIP.conf 可能被新版預設檔取代(RPM 會把舊檔改名為 /etc/GeoIP.conf.rpmsave;DEB 會詢問是否保留,請選擇保留目前版本),導致 AccountID 與 License Key 遺失。升級前請先備份設定檔。
- 備份設定檔並更新套件
cp -p /etc/GeoIP.conf /etc/GeoIP.conf.bak

# Rocky Linux
rpm -Uvh geoipupdate_${VER}_linux_amd64.rpm

# Debian / Ubuntu
dpkg -i geoipupdate_${VER}_linux_amd64.deb
- 確認版本、設定檔內容與權限,並手動執行一次更新
geoipupdate -V
ls -l /etc/GeoIP.conf*
/usr/bin/geoipupdate -v
多台 Graylog 節點
使用本機資料庫檔案時,每一台 Graylog 節點都必須有該檔案,因此每台節點都要安裝 geoipupdate 並設定排程更新。
疑難排解
- 錯誤訊息: 安裝新版 geoipupdate 時,與系統既有的舊版 GeoIP/geoipupdate 套件檔案衝突(以下為 CentOS 7 時期安裝 4.1.5 版的輸出)
# rpm -i geoipupdate_4.1.5_linux_amd64.rpm
        file /etc/GeoIP.conf from install of geoipupdate-4.1.5-1.x86_64 conflicts with file from package geoipupdate-2.5.0-1.el7.x86_64
        file /usr/bin/geoipupdate from install of geoipupdate-4.1.5-1.x86_64 conflicts with file from package geoipupdate-2.5.0-1.el7.x86_64

或者

# rpm -i geoipupdate_4.1.5_linux_amd64.rpm
        file /etc/GeoIP.conf from install of geoipupdate-4.1.5-1.x86_64 conflicts with file from package geoipupdate-2.5.0-1.el7.x86_64
        file /usr/bin/geoipupdate from install of geoipupdate-4.1.5-1.x86_64 conflicts with file from package geoipupdate-2.5.0-1.el7.x86_64
        file /usr/share/GeoIP from install of geoipupdate-4.1.5-1.x86_64 conflicts with file from package GeoIP-1.5.0-14.el7.x86_64
解決方式: 先移除舊套件再安裝。Rocky Linux 8 的套件庫仍有舊版 geoipupdate 與 GeoIP,可能遇到同樣的衝突;Rocky Linux 9 以後的官方套件庫已無這兩個套件,通常不會發生。
dnf remove geoipupdate GeoIP