Graylog 6 安裝及設定 - Debian 12
BUBU 因最近都在忙著處理公司的事情,沒有時間測試新的系統,那今日有空就將 Graylog 最新版重新安裝並且測試,雖然過程中有讓我卡關但是後來還是有處理好了。
2024.01.11 系統升為 Debian12、MongoDB升為 7
2024.06.15 Graylog 更新為 6.0 版本
運行環境
本工作室環境都是在 「Proxmox VE 」 虛擬系統上架設,都是以 「 LXC 」模式為主,除非有特殊狀況會告知使用 「 VM 」 模式
- 系統環境: Debian 12
- Web 服務: Nginx 1.24
更新系統
- 更新系統
sudo apt update && sudo apt upgrade -y && init 6
- 安裝必要的套件服務
sudo apt install uuid-runtime pwgen dirmngr gnupg wget net-tools htop iftop iotop python3-pip glances nano curl -y
安裝MongoDB
- 新增加 MongoDB 金鑰
curl -fsSL https://pgp.mongodb.com/server-7.0.asc | \
   sudo gpg -o /usr/share/keyrings/mongodb-server-7.0.gpg \
   --dearmor
- 新增加 MongoDB 來源庫
echo "deb [ signed-by=/usr/share/keyrings/mongodb-server-7.0.gpg ] http://repo.mongodb.org/apt/debian bookworm/mongodb-org/7.0 main" | sudo tee /etc/apt/sources.list.d/mongodb-org-7.0.list
- 安裝 MongoDB 服務
sudo apt-get update && sudo apt-get install -y mongodb-org
- 設定 MongoDB 啟動服務
# 重新載入系統設定檔
sudo systemctl daemon-reload

# 開機時自動啟動
sudo systemctl enable mongod.service
or
sudo systemctl enable --now mongod.service

# 啟動 MongoDB 服務
sudo systemctl restart mongod.service

# 查看目前該服務狀態
sudo systemctl --type=service --state=active | grep mongod
or
sudo systemctl status mongod.service
安裝 OpenSearch
- 新增加 OpenSearch 金鑰
curl -o- https://artifacts.opensearch.org/publickeys/opensearch.pgp | sudo gpg --dearmor --batch --yes -o /usr/share/keyrings/opensearch-keyring
- 新增加 OpenSearch 來源庫
echo "deb [signed-by=/usr/share/keyrings/opensearch-keyring] https://artifacts.opensearch.org/releases/bundle/opensearch/2.x/apt stable main" | sudo tee /etc/apt/sources.list.d/opensearch-2.x.list
2024.06.16 在安裝 OpenSearch 服務要注意版本,在官方公告為了系統安全性的關係在 2.12 之後版本在安裝服務同時也要設定管理者的密碼才能進行安裝不然會卡住安裝不過
- 安裝 OpenSearch 在
custom-admin-password請修改成您的密碼,密碼必須至少包含 8 個字符,其中至少包含 1 個大寫字母、1 個小寫字母、1 個數字和 1 個特殊字符
sudo apt update && sudo env OPENSEARCH_INITIAL_ADMIN_PASSWORD="custom-admin-password" apt-get install opensearch -y
- 修改 OpenSearch 設定檔
sudo tee -a /etc/opensearch/opensearch.yml > /dev/null <<EOT
cluster.name: graylog
node.name: ${HOSTNAME}
discovery.type: single-node
network.host: 0.0.0.0
action.auto_create_index: false
plugins.security.disabled: true
EOT
- 選擇性修改
vim /etc/opensearch/opensearch.yml
# 如果您有修改資料存放路徑要修改該目錄的權限為 `opensearch` 和 `777`
path.data: /opt/opensearch_data
path.logs: /var/log/opensearch

# 把以下的設定都註解基本上社群版是使用不到
######## Start OpenSearch Security Demo Configuration ########
# WARNING: revise all the lines below before you go into production
#plugins.security.ssl.transport.pemcert_filepath: esnode.pem
#plugins.security.ssl.transport.pemkey_filepath: esnode-key.pem
#plugins.security.ssl.transport.pemtrustedcas_filepath: root-ca.pem
#plugins.security.ssl.transport.enforce_hostname_verification: false
#plugins.security.ssl.http.enabled: true
#plugins.security.ssl.http.pemcert_filepath: esnode.pem
#plugins.security.ssl.http.pemkey_filepath: esnode-key.pem
#plugins.security.ssl.http.pemtrustedcas_filepath: root-ca.pem
#plugins.security.allow_unsafe_democertificates: true
#plugins.security.allow_default_init_securityindex: true
#plugins.security.authcz.admin_dn:
#  - CN=kirk,OU=client,O=client,L=test, C=de

#plugins.security.audit.type: internal_opensearch
#plugins.security.enable_snapshot_restore_privilege: true
#plugins.security.check_snapshot_restore_write_privileges: true
#plugins.security.restapi.roles_enabled: ["all_access", "security_rest_api_access"]
#plugins.security.system_indices.enabled: true
#plugins.security.system_indices.indices: [".plugins-ml-config", ".plugins-ml-connector", ".plugins-ml-model-group", ".plugins-ml-model", ".plugins-ml-task", ".plugins-ml-conversation-meta", ".plugins-ml-conversation-interactions", ".opendistro-alerting-config", ".opendistro-alerting-alert*", ".opendistro-anomaly-results*", ".opendistro-anomaly-detector*", ".opendistro-anomaly-checkpoints", ".opendistro-anomaly-detection-state", ".opendistro-reports-*", ".opensearch-notifications-*", ".opensearch-notebooks", ".opensearch-observability", ".ql-datasources", ".opendistro-asynchronous-search-response*", ".replication-metadata-store", ".opensearch-knn-models", ".geospatial-ip2geo-data*"]
#node.max_local_storage_nodes: 3
######## End OpenSearch Security Demo Configuration ########
- 調整 java 記憶體
vim /etc/opensearch/jvm.options,假設您本機的記憶體是設定 8G 那會建議先拿 4G 提供給服務使用
-Xms4g
-Xmx4g
- 由於我是在 LXC 上運行的關係,此指參數無法正常執行,這需在 PVE 環境上執行該指令
sudo sysctl -w vm.max_map_count=262144

# 確認是否有修改成功
sysctl -a|grep vm.max_map_count
- 設定內核參數
sudo echo 'vm.max_map_count=262144' >> /etc/sysctl.conf
- 設定 OpenSearch 啟動服務
# 重新載入系統設定檔
sudo systemctl daemon-reload

# 開機自動啟動服務
sudo systemctl enable opensearch.service

# 啟動 OpenSearch 服務
sudo systemctl restart opensearch.service
or
sudo systemctl enable --now opensearch.service

# 查檢目前該服務狀態
sudo systemctl --type=service --state=active | grep opensearch.service
or
sudo systemctl status opensearch.service
- 檢查 OpenSearch 健康狀況
curl –XGET localhost:9200/_cluster/health?pretty=true
若一切正常,應該會得到以下訊息內容
curl: (3) Failed to convert –XGET to ACE; string contains a disallowed character

{
  "cluster_name" : "graylog",
  "status" : "green",
  "timed_out" : false,
  "number_of_nodes" : 1,
  "number_of_data_nodes" : 1,
  "discovered_master" : true,
  "discovered_cluster_manager" : true,
  "active_primary_shards" : 3,
  "active_shards" : 3,
  "relocating_shards" : 0,
  "initializing_shards" : 0,
  "unassigned_shards" : 0,
  "delayed_unassigned_shards" : 0,
  "number_of_pending_tasks" : 0,
  "number_of_in_flight_fetch" : 0,
  "task_max_waiting_in_queue_millis" : 0,
  "active_shards_percent_as_number" : 100.0
}
安裝 Graylog Server
- 新增加 Graylog 來源庫
wget https://packages.graylog2.org/repo/packages/graylog-6.0-repository_latest.deb
sudo dpkg -i graylog-6.0-repository_latest.deb
- 安裝 Graylog 服務
sudo apt-get update && sudo apt-get install graylog-server
- 設置Graylog管理員的密鑰
利用pwgen輔助工具產生密碼for server.conf中的password_secret
SECRET=$(pwgen -s 96 1)

sudo -E sed -i -e 's/password_secret =.*/password_secret = '$SECRET'/' /etc/graylog/server/server.conf
- 查看
/etc/graylog/server/server.conf內容,password_secret參數如下
- 設定 Graylog 管理員 admin 的密碼,由於密碼使用
SHA雜湊演算法,我們需要把明文密碼轉換為hash值,然後賦值給root_password_sha2參數。
例如:以下列命令產生密碼為 test1234 的 hash 值。
echo -n test1234 | sha256sum | awk '{print $1}'
- 以下是產生出來的畫面
- 將以上命令產出之
Hash值,填入到server.conf中root_password_sha2參數。vim /etc/graylog/server/server.conf
- 設定 Graylog 服務,開啟設定檔
vim /etc/graylog/server/server.conf
這是設定 http
http_bind_address = 0.0.0.0:9000 (192.168.x.x為Graylog Server IP)
http_publish_uri = http://0.0.0.0:9000

設定郵件
root_email = "[email protected]"

設定時區,不然收到的記錄會是國際標準時區
root_timezone = Asia/Taipei # 重要,若不設定為ROC,則進來Log的timestamp會變成以UTC時間紀錄,

# 允許wildcard搜尋語法
allow_leading_wildcard_searches = true

# 安裝 5.2 會無法正常登入到 Graylog 系統,需增加下面的參數
elasticsearch_hosts = http://127.0.0.1:9200
- 設定 Graylog 啟動服務
啟重 Graylog 服務
systemctl start graylog-server.service

開機時自動啟重 Graylog 服務
systemctl enable graylog-server.service
or
sudo systemctl enable --now graylog-server.service
登錄 Graylog Web
- 使用瀏覽器訪問 http://graylog_public_IP_domain:9000/,你應該可以看到一個登錄介面,使用帳號 admin 和前面設置的密碼登入。
登入Graylog設定syslog服務
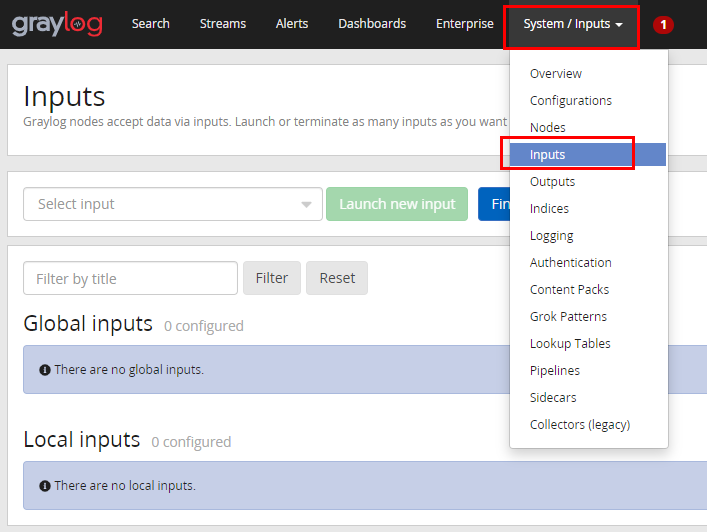
- 增加syslog服務
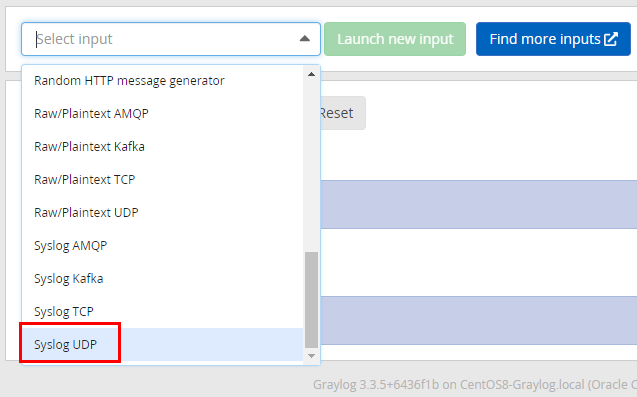
- 選擇你想要接收的服務,例:Syslog UDP
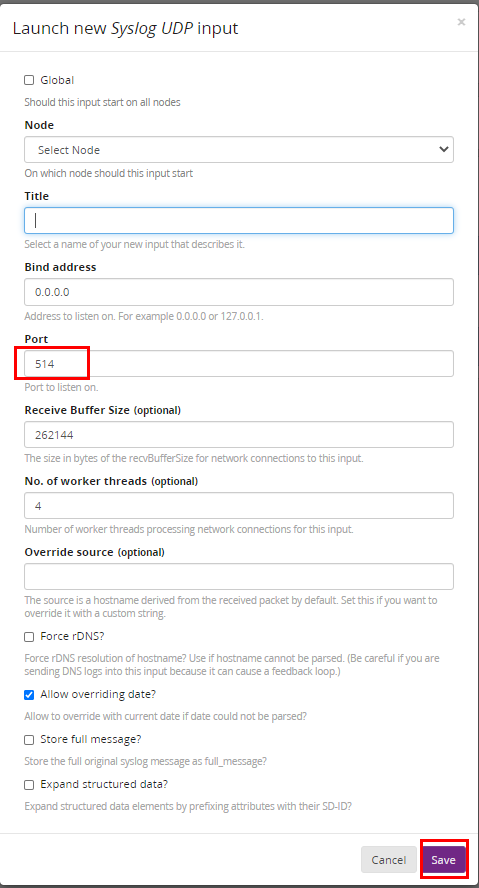
- 新增畫面,接收的名稱及Port號,填完之後存檔,就可以開始接收記錄了。
使用 NGINX 代理方式來連線
-
請參考本站所編寫文章 Nginx 模組擴充 - Debian \ Ubuntu
-
新增給 Graylog 服務設定檔
vim /etc/nginx/conf.d/graylog.conf
server {
    listen 80 default_server;
    listen [::]:80 default_server ipv6only=on;
    server_name 你的ip或網址;
    #
    access_log /var/log/nginx/graylog_access.log;
    error_log /var/log/nginx/graylog_error.log;
    #
    fastcgi_buffers 64 4K;
    #
	location / {
		proxy_set_header Host $http_host;
		proxy_set_header X-Forwarded-Host $host;
		proxy_set_header X-Forwarded-Server $host;
		proxy_set_header X-Forwarded-For $proxy_add_x_forwarded_for;
		proxy_set_header X-Graylog-Server-URL http://$server_name/;
		proxy_pass http://127.0.0.1:9000;
	}
}
- 啟動及自動啟動服務
systemctl start nginx ; systemctl enable nginx
or
sudo systemctl enable --now nginx


