CentOS 8 LNMP 安裝
記錄一下新版的 CentOS 8 安裝流程
運行環境
CentOS 8、PHP 7.3、MariaDB 10.4、Nginx 1.17
安裝或測試過程
Nginx服務
在CentOS 8 本身預設版本是 1.14,那 Nginx 官方版本穩定版目前是 1.16 ,開發版 1.17,如不想使用預設版本想要使用官方採用的版請參考本次安裝流程
到 Nginx 官方網站參考目前如何新增來源庫
- 先安裝可以選擇指定的 yum 的套件
dnf install dnf-utils -y
- 新增
vim /etc/yum.repos.d/nginx.repo官方所提供的來源庫
[nginx-stable]
name=nginx stable repo
baseurl=http://nginx.org/packages/centos/$releasever/$basearch/
gpgcheck=1
enabled=1
gpgkey=https://nginx.org/keys/nginx_signing.key
module_hotfixes=true

[nginx-mainline]
name=nginx mainline repo
baseurl=http://nginx.org/packages/mainline/centos/$releasever/$basearch/
gpgcheck=1
enabled=0
gpgkey=https://nginx.org/keys/nginx_signing.key
module_hotfixes=true
- 指定所要安裝的版本,目前官方有兩個版本可以選擇,一個是(nginx-stable)穩定版另一個是(nginx-mainline)開發版,那 BUBU 我都是安裝開發版本,使用上沒有什麼樣子的問題,由於是個人使用是還好,如果是公司單位使用會建議採用穩定版或者預設版本來做使用。
yum-config-manager --enable nginx-mainline
- 安裝 Nginx 服務,如果想要安裝自行新增的來源庫的話,要下這一段指令才能安裝,不然會安裝到預設的安裝檔
--disablerepo=AppStream
dnf install nginx --disablerepo=AppStream -y
- 啟動服務
systemctl start nginx ; systemctl enable nginx
MariaDB服務
CentOS 8 現在預設是用 MariaDB 10.3 版本,想使用 MariaDB 10.4 版本可以利用新增來源庫來安裝
- 新增加官方來源庫 MariaDB
vim /etc/yum.repos.d/MariaDB.repo
# MariaDB 10.4 CentOS repository list - created 2019-11-05 05:10 UTC
# http://downloads.mariadb.org/mariadb/repositories/
[mariadb]
name = MariaDB
baseurl = http://yum.mariadb.org/10.4/centos8-amd64
gpgkey=https://yum.mariadb.org/RPM-GPG-KEY-MariaDB
gpgcheck=1
- 安裝 MariaDB 服務
Disabling the AppStream repo is necessary for the time being in order for our MariaDB-server package to be found and used by dnf. And because the required boost-program-options package is located in the AppStream repo, it needs to be installed prior to installing MariaDB-server.
dnf install boost-program-options -y
dnf install MariaDB-server MariaDB-client --disablerepo=AppStream -y
- 啟動 MariaDB 服務
systemctl enable mariadb ; systemctl start mariadb
- 設定 MariaDB 服務
mysql_secure_installation   # 設定資料庫的root密碼

NOTE: RUNNING ALL PARTS OF THIS SCRIPT IS RECOMMENDED FOR ALL MariaDB
      SERVERS IN PRODUCTION USE!  PLEASE READ EACH STEP CAREFULLY!

In order to log into MariaDB to secure it, we'll need the current
password for the root user. If you've just installed MariaDB, and
haven't set the root password yet, you should just press enter here.

Enter current password for root (enter for none):
OK, successfully used password, moving on...

Setting the root password or using the unix_socket ensures that nobody
can log into the MariaDB root user without the proper authorisation.

You already have your root account protected, so you can safely answer 'n'.

Switch to unix_socket authentication [Y/n]
Enabled successfully!
Reloading privilege tables..
 ... Success!


You already have your root account protected, so you can safely answer 'n'.

Change the root password? [Y/n]
New password:                      # 設定 root 的密碼
Re-enter new password:             # 確認 root 的密碼
Password updated successfully!
Reloading privilege tables..
 ... Success!


By default, a MariaDB installation has an anonymous user, allowing anyone
to log into MariaDB without having to have a user account created for
them.  This is intended only for testing, and to make the installation
go a bit smoother.  You should remove them before moving into a
production environment.

Remove anonymous users? [Y/n]
 ... Success!

Normally, root should only be allowed to connect from 'localhost'.  This
ensures that someone cannot guess at the root password from the network.

Disallow root login remotely? [Y/n]
 ... Success!

By default, MariaDB comes with a database named 'test' that anyone can
access.  This is also intended only for testing, and should be removed
before moving into a production environment.

Remove test database and access to it? [Y/n]
 - Dropping test database...
 ... Success!
 - Removing privileges on test database...
 ... Success!

Reloading the privilege tables will ensure that all changes made so far
will take effect immediately.

Reload privilege tables now? [Y/n]
 ... Success!

Cleaning up...

All done!  If you've completed all of the above steps, your MariaDB
installation should now be secure.

Thanks for using MariaDB!
PHP 7.3 服務
CentOS 8 預設版本是 PHP 7.2 版,那如果想要使用比較新的版本的話需要新增加來源庫安裝
- 安裝
epel-release套件服務
dnf install -y epel-release
- 安裝官方所提供來源庫版本
dnf install https://rpms.remirepo.net/enterprise/remi-release-8.rpm -y
- 查詢目前可安裝的版本
dnf module list php
-
執行結果如下

-
使用 PHP 7.3 版本
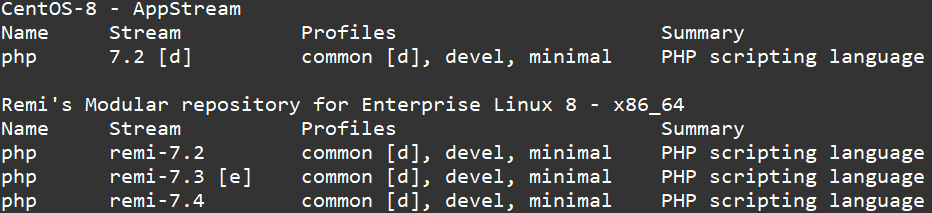
dnf module reset php
dnf module enable php:remi-7.3
- 使用 PHP 7.4 版本
dnf module reset php
dnf module enable php:remi-7.4
- 安裝 PHP 服務
dnf install -y php php-mysqlnd php-pdo php-xml php-pear php-mbstring php-fpm php-mysql php-gd php-cli \
php-json php-opcache php-curl php-ldap php-odbc php-xmlrpc php-soap php-intl php-zip curl curl-devel \
gcc-c++ gcc php-tidy
- 設定
php.ini檔
vim /etc/php.ini

[Date]
修改前
;date.timezone =
修改後
date.timezone = Asia/Taipei

存檔
:wq
- 設定
php-fpm
vim /etc/php-fpm.d/www.conf

; RPM: apache user chosen to provide access to the same directories as httpd
;user = apache
user = nginx
; RPM: Keep a group allowed to write in log dir.
;group = apache
group =nginx

存檔
:wq
- 啟動服務
systemctl restart php-fpm ; systemctl enable php-fpm
Nginx 設定檔
 location ~ \.php$ {
        root   /usr/share/nginx/html;
        fastcgi_pass unix:/run/php-fpm/www.sock;
        fastcgi_index index.php;
        try_files $uri =404;
        fastcgi_param SCRIPT_FILENAME  $document_root$fastcgi_script_name;
        include fastcgi_params;
    }
- 重啟服務
systemctl restart nginx
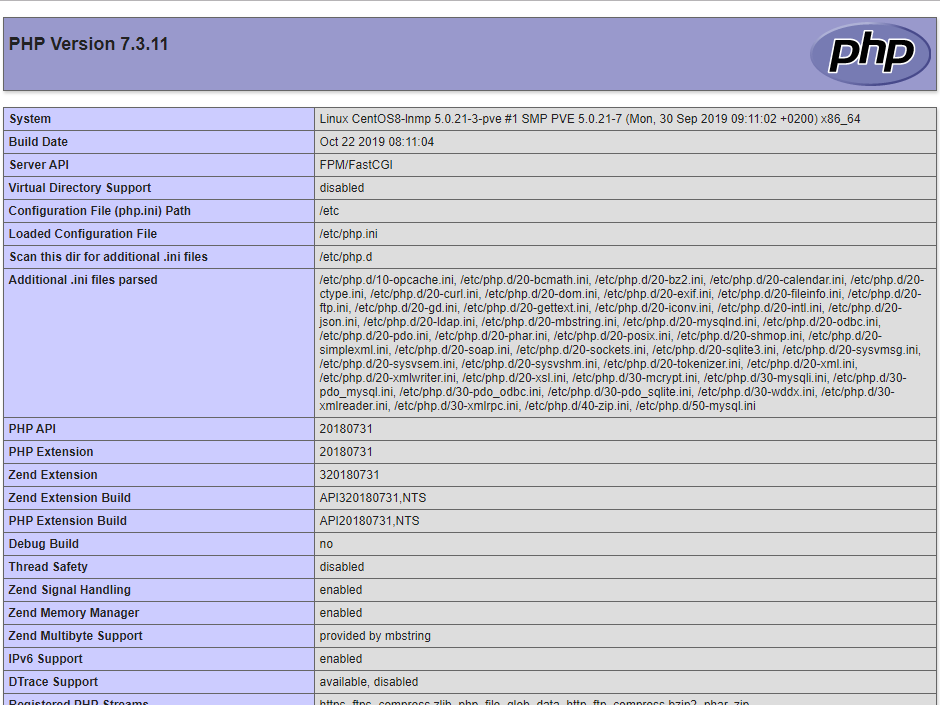
- 測試 PHP 是否能夠正在運行,在 web 服務目錄新增 info.php 檔
<?php
  phpinfo();
?>
- 執行結果如下