
acme.sh + Cloudflare 自動更新 Let's Encrypt 服務
之前 BUBU 是使用萬用字元方式來更新憑證,結果之前憑證快到期了,發現到自動更換憑證是無法使用的,結果導至只能用手動方式去更換憑證,現在可以使用域網服務商上面的 API 方式來進行更新憑證。
安裝 acme.sh 此套件,該套件已有建立好已有提供的 API 功能,如果所採買的網域商裡面有提供 API 介面的話,可以查詢一下怎麼使用,該套件裡面有解說每個 API 要怎麼使用。
安裝 acme.sh 套件
curl https://get.acme.sh | sh
Or
wget -O - https://get.acme.sh | sh
安裝完之後會在 root 目錄下產生一個 .acme.sh 資料夾
CloudFlare 設定
- 登入您的 CloudFlare ,選擇其中一個網域之後該頁面會下方會有一個 API 的選項

- 選擇
Global API Key的檢視
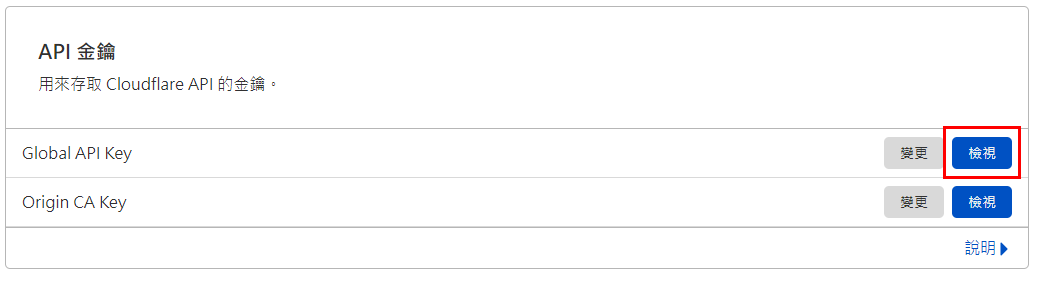
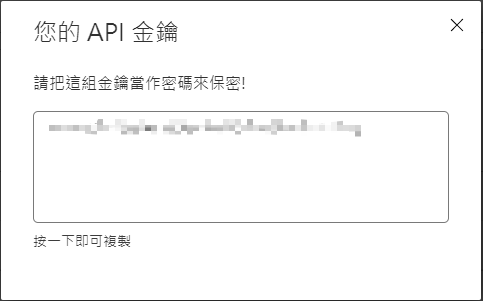
- 系統會要求再次輸入您的密碼

- 輸入完之後就會看到您的專屬的 API 的 KEY 了
- 再來使用腳本方式 shell script 來更新憑證,產生的憑證會一份是在 acme.sh 目錄下會看到此目錄
acme.sh 每 60 天會自動重新加載這個指令來自動續期憑證,完全不需手動執行任何操作!
P.S 如果你有很多網域想要使用一個憑證是可以的
export CF_Key="Your_CloudFlare_API_Key"
export CF_Email="[email protected]"

/root/.acme.sh/acme.sh --issue --dns dns_cf -d "*.YourDomainName.com" -d "YourDomainName.com" --log \
--cert-file /etc/nginx/ssl/cert.crt \              # 複製憑證到指定的目錄下面
--key-file /etc/nginx/ssl/privkey.key \                # 複製憑證到指定的目錄下面
--fullchain-file /etc/nginx/ssl/fullchain.crt \    # 複製憑證到指定的目錄下面
--ca-file /etc/nginx/ssl/chain.crt \                  # 複製憑證到指定的目錄下面
--reloadcmd "systemctl reload nginx"               # 如果是用 Apache 請自己修改
OR
export CF_Key="Your_CloudFlare_API_Key"
export CF_Email="[email protected]"

/root/.acme.sh/acme.sh --issue --dns dns_cf -d "*.YourDomainName.com" -d "YourDomainName.com" --log \
--cert-file /etc/nginx/ssl/cert.pem \              # 複製憑證到指定的目錄下面
--key-file /etc/nginx/ssl/privkey.pem \                # 複製憑證到指定的目錄下面
--fullchain-file /etc/nginx/ssl/fullchain.pem \    # 複製憑證到指定的目錄下面
--ca-file /etc/nginx/ssl/chain.pem \                  # 複製憑證到指定的目錄下面
--reloadcmd "systemctl reload nginx"               # 如果是用 Apache 請自己修改
將剛剛手動增加的腳本加入可以執行的權限,命令如下:
chmod a+x 腳本檔
再去執行此腳本之後就結束了,再把產生出來的憑證複製到其他主機上就可以了
自動更新 acme.sh
- 因 acme.sh 會不定時更新系統資訊,會建議讓系統自動去更新 acme.sh 的資料
手動更新
acme.sh --upgrade
啟用自動更新
acme.sh --upgrade --auto-upgrade
禁用自動更新
acme.sh --upgrade --auto-upgrade 0
停止自動續期憑證
將 -d 後面的修改成不要繼續使用憑證
acme.sh --remove -d xxx.com
補充說明
憑證檔案分別會有 4 個
| 檔案名稱 | 說明 |
|---|---|
| cert.pem | 申請網域的憑證 |
| chain.pem | Let's Encrypt 的憑證 |
| fullchain.pem | cert.pem 及 chain.pem 合併檔案 |
| privkey.pem | 申請網域的憑證密鑰 |
BUBU 因原本在使用服務主機有異常,所以有重新安裝新的服務來執行自動去申請憑證,發現到現在所在使用的 acme.sh 已經被 ZeroSSL 收購了,造成我在申請完憑證要給 mail server 使用無法正常使用,原是 acme.sh 預設憑證中心中是 Let's Encrypt ,那被收購後已經改為 ZeroSSL 那由於該憑證中心是屬於商業中心,不像 Let's Encrypt 是屬於非營利機構所以被 acme.sh 改成不是預設憑證申請中心了。那現在還可不可以跟 Let's Encrypt 答案是可以,只要修改 acme.sh 的預設值就可以,以下是教怎麼修改此預設值。
acme.sh --set-default-ca --server letsencrypt
強制更新憑證
acme.sh --renew --dns dns_cf --dnssleep 120 -d "*.YourDomainName.com" -d "YourDomainName.com" --force --log
HTTP 驗證
BUBU最近在公司才知道還有 HTTP 方式來進行驗證申請,但這個方式只能針對單一網址方式進行驗證,不能跟 DNS 方式可以進行萬用憑證方式進行驗證,如果您所使用站台單純只是個單一網址那就可以使用這個方式申請憑證。
- 只要一行指令就可以申請憑證了
/root/.acme.sh/acme.sh --issue -d 網址 -w 網站根目錄位置

# 例如
/root/.acme.sh/acme.sh --issue -d dannyliu.me -w /home/danny/wordpress/
或者
/root/.acme.sh/acme.sh --issue -d 網址 --webroot 網站根目錄位置
- 利用 apache 服務方式申請
/root/.acme.sh/acme.sh --issue -d 網址 --apache
- 利用 nginx 服務方式申請
/root/.acme.sh/acme.sh --issue -d 網址 --nginx
- 指定憑證存放位置
/root/.acme.sh/acme.sh --install-cert -d 網址 \
  --cert-file /etc/nginx/ssl/cert.pem \
  --key-file /etc/nginx/ssl/privkey.pem \
  --fullchain-file /etc/nginx/ssl/fullchain.pem \
  --ca-file /etc/nginx/ssl/chain.pem \
  --reloadcmd "systemctl reload nginx"
- 如果在 acme.sh 無法判別 nginx 設定檔路徑可以指定路徑
/root/.acme.sh/acme.sh --issue -d 網址 --nginx /etc/nginx/conf.d/xxx.conf
移除 acme.sh 程式
- 刪除目錄
rm -rf /root/.acme.sh
- 刪除排程任務
crontab -e - 刪除別名
unalias acme.sh
- 刪除在
vim .bashrc的參數
/root/.acme.sh/acme.sh.env