
如何增加第二顆硬碟
先下 # ls /dev/sd* 先看有抓取到那些硬碟資訊,通常第一顆系統碟都是 sda 開頭的其他新增加的硬碟都是依順 sdb、sdc...... 依此類推,再來為新增加的硬碟進行磁區的分割
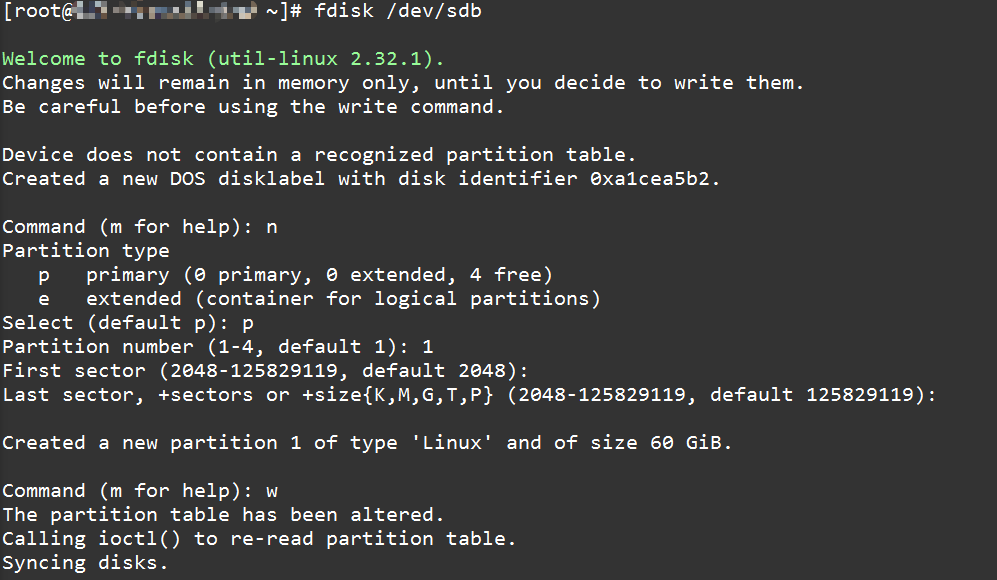
# fdisk /dev/sdb
fdisk 是一個互動模式的分割工具,輸入 m 再按 Enter 可以顯示各種指令的說明:
WARNING: DOS-compatible mode is deprecated. It’s strongly recommended to
switch off the mode (command ‘c’) and change display units to
sectors (command ‘u’).
Command (m for help): m
Command action
a toggle a bootable flag
b edit bsd disklabel
c toggle the dos compatibility flag
d delete a partition
l list known partition types
m print this menu
n add a new partition
o create a new empty DOS partition table
p print the partition table
q quit without saving changes
s create a new empty Sun disklabel
t change a partition’s system id
u change display/entry units
v verify the partition table
w write table to disk and exit
x extra functionality (experts only)
Command (m for help):
首先我們要新增一個分割區,步驟如下
- 新增分割區,輸入
n按Enter - 選擇要建立
extended還是primary partition,因為我的硬碟全部只要一個分割區,所以我選primary,輸入p按Enter - 選擇
Partition number,primary分割區最多可以有四個,隨便選都可以,不過建議選 1,免得以後看起來很奇怪,輸入1按Enter - 輸入開始的
cylinder,用預設值就可以了,直接按Enter - 輸入結束的
cylinder,若是要用最大的容量,就直接按Enter,若是要指定分割區的大小,就用+size{K,M,G}的形式指定,例如指定為 100G 的大小就輸入+100G再按Enter - 最後將分割表寫入硬碟,輸入
w再按Enter
- 以上整個過程看起來就像這樣
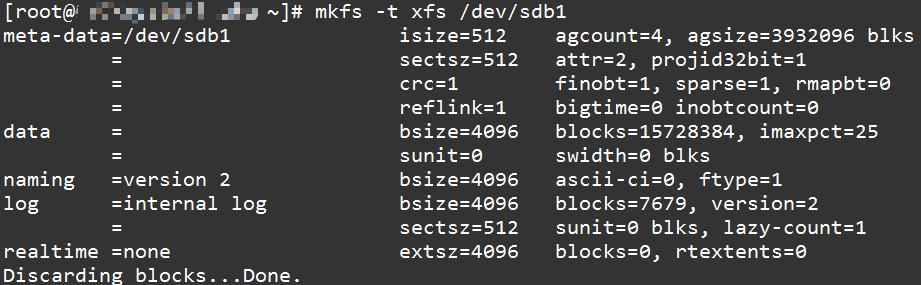
再來就是格式化剛剛建立好的硬碟,格式化指令用 mkfs -t ext4 /dev/sdb1 其中 -t 選項可以指定檔案系統,若是 xfs 的話就指定為 -t xfs。等他跑完,硬碟的格式化就完成了,其輸出大約會像這樣
再來就是掛載硬碟,掛載硬碟還是盡量以 UUID 資訊為主這樣子在後面新增硬碟才不會有問題下 blkid 就可以顯示出你所有的硬碟裡資訊的 UUID 有那些

用框框起來是剛剛格式化出的硬碟資訊,再把新的硬碟資訊寫入到 vim /etc/fstab

用框框圈起來是要增加的資訊,並且給該硬碟一個名稱例如: /data or /XXX 之類的只要你以分辨出是其他硬碟名稱為主