
Debian \ Ubuntu 修改 IP
BUBU 因最近有測試一些系統那想要修改 IP ,那之前都是用 CentOS 系統這次是用 Ubuntu 修改地方不太一樣因此記錄一下如何修改,以便日後查看
2024.10.13 修改 Ubuntu 網卡設定
運行環境
環境都是在 「Proxmox VE 」 虛擬系統上架設,都是以 「 LXC 」模式為主,除非有特殊狀況會告知使用 「 VM 」 模式
- 系統環境: Ubuntu22.04 (KVM)
設定過程
- 修改網卡位置
sudo vim /etc/netplan/50-cloud-init.yaml,先用ip a確認網卡名稱
修改前
# This file is generated from information provided by the datasource.  Changes
# to it will not persist across an instance reboot.  To disable cloud-init's
# network configuration capabilities, write a file
# /etc/cloud/cloud.cfg.d/99-disable-network-config.cfg with the following:
# network: {config: disabled}
network:
  ethernets:
    ens18:
      dhcp4: true
  version: 2
修改後
# This file is generated from information provided by the datasource.  Changes
# to it will not persist across an instance reboot.  To disable cloud-init's
# network configuration capabilities, write a file
# /etc/cloud/cloud.cfg.d/99-disable-network-config.cfg with the following:
# network: {config: disabled}
network:
    ethernets:
        ens18:
            dhcp4: false # 關閉 DHCP 啟動的話是打 true
            addresses:
              - 192.168.1.37/24 # 網卡 IP
            routes:
              - to: default
                via: 192.168.1.1 # Gateway
            nameservers:
               addresses: [168.95.1.1,8.8.8.8] # DNS 服務
    version: 2
- 網卡資訊生效
sudo netplan apply
補充說明
- 修改 Debian 系統 IP
vim /etc/network/interfaces

auto eth0
iface eth0 inet static
 address 192.168.1.21
 netmask 255.255.255.0
 gateway 192.168.1.1
- 修改 DNS
vim /etc/resolv.conf

# Generated by NetworkManager
 search 您的域名
 nameserver 8.8.8.8
 nameserver 168.95.1.1
- 重啟網卡服務
ifdown eth0
ifup eth0

或者

systemctl restart networking (但這個指令好像會失敗最後 BUBU 是直接重啟系統)
補充說明
BUBU 之前都是習慣用 NetworkManager 介面來進行 IP 修改操作,這陣子幫群友設定時候發現到跟我當設方式不一樣,也一時之間想不出來我當時是怎麼設定的,所以上面是後來查到修改確定可以正常使用記錄。下面的方式是會以文字介面 GUI 方式進行操作
因 Debian 系統只有在視窗版才會安裝,如果您安裝的 Debian 是最小容量版本話就不會安裝該套件需要手動去安裝可以使用
- 安裝
NetworkManager
$ apt install network-manager
- 將內建設定的網卡設定方式先註解
vim /etc/network/interfaces

# The primary network interface
#allow-hotplug ens18     << 註解
#iface ens18 inet dhcp   << 註解
-
重啟系統
-
輸入
nmtui就會出現
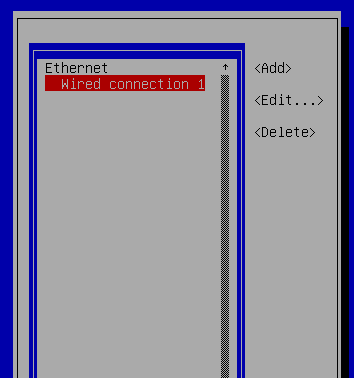
- 選擇要編輯的網卡
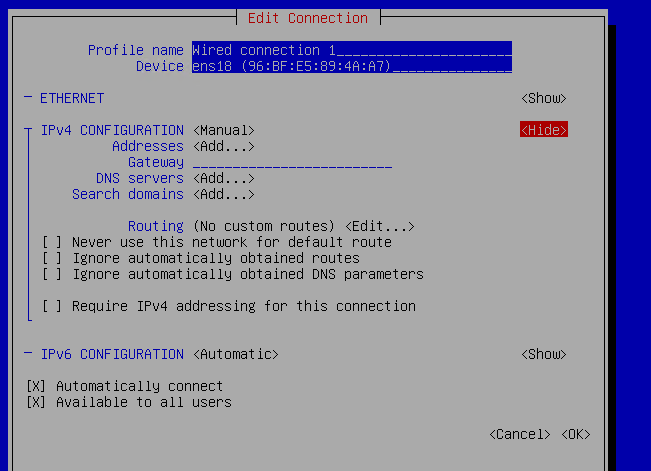
- 編輯方式請參考本站之前用 CentOS 方式 CentOS 7 網路設定

- 回到第一頁選擇
Activate a connection選擇要啟用網卡。