Proxmox VE 設定smtp寄信
因為在做資料備份時,想要知道資料是否有正常的備份成功,所以需要讓系統自己寄信通知以下是設定的方式。
BUBU 我是用 GMAIL 帳號去做寄信動作。
Proxmox VE 5.x 版之前可以使用
- 安裝 SSMTP
apt install ssmtp mailutils -y
- 將 SSMTP 的設定檔備份起來
cp /etc/ssmtp/ssmtp.conf /etc/ssmtp/ssmtp.conf.default
- 編輯 SSMTP 設定檔
/etc/ssmtp/ssmtp.conf
# 接收系統郵件的 Email
[email protected]

# 使用 GMail 的 MTA 送信
mailhub=smtp.gmail.com:587

# 設定 hostname
hostname=raspberrypi

# 允許使用者設定 Email 的 From 欄位
FromLineOverride=YES

# Google 帳號與密碼
[email protected]
AuthPass=YOUR_PASSWORD

# 啟用安全加密連線
UseSTARTTLS=YES
UseTLS=YES

# 輸出除錯資訊
Debug=YES
- 設定完之後在測試是否可以正常運行,可以用下面的指令測試看看是否有收到信件
echo "This is a test" | ssmtp [email protected]
Proxmox VE 6.x 版之後可以使用
由於之前所使用的套件,在新版目前原作者沒有在維護,因此採用 PVE 本身的 Postfix 服務來寄送服務
109.10.26 因目前沒有在使用 gmail 來當 smtp 服務,已轉由內部 mail 服務來處理
- 在設定之前先安裝必要的套件服務
apt install libsasl2-modules postfix-pcre
- postfix 服務下的設定檔
vim /etc/postfix/main.cf
# See /usr/share/postfix/main.cf.dist for a commented, more complete version

myhostname=tn2-pve-03.local

smtpd_banner = $myhostname ESMTP $mail_name (Debian/GNU)
biff = no

# appending .domain is the MUA's job.
append_dot_mydomain = no

# Uncomment the next line to generate "delayed mail" warnings
#delay_warning_time = 4h

alias_maps = hash:/etc/aliases
alias_database = hash:/etc/aliases
mydestination = $myhostname, localhost.$mydomain, localhost
#relayhost =   << 將這裡註解起來不要用
mynetworks = 127.0.0.0/8
inet_interfaces = loopback-only
recipient_delimiter = +

新增以下的內容

# sets mail server as relay
relayhost = 郵件伺服器:587

#  use tls
smtp_use_tls=yes

# use sasl when authenticating to foreign SMTP servers
smtp_sasl_auth_enable = yes

# path to password map file
smtp_sasl_password_maps = hash:/etc/postfix/sasl_passwd

# list of CAs to trust when verifying server certificate
smtp_tls_CAfile = /etc/ssl/certs/ca-certificates.crt

# eliminates default security options which are imcompatible with gmail
smtp_sasl_security_options = noanonymous

#for outgoing changes only "smtp".
smtp_header_checks = pcre:/etc/postfix/smtp_header_checks

# envelope_sender
sender_canonical_maps = regexp:/etc/postfix/sender_canonical_maps
- 在 postfix 新增加一個檔案
vim /etc/postfix/sasl_passwd,在下面新增加您在 gmail 的帳號及密碼
郵件伺服器:587 username:password
- 執行
sasl_passwd
postmap /etc/postfix/sasl_passwd
- 新增
FROM資訊vim /etc/postfix/smtp_header_checks
/^From:.*/ REPLACE From: HOSTNAME-alert <[email protected]>
- 新增寄件者郵件
vim /etc/postfix/sender_canonical_maps
/.+/ [email protected]
- 設定權限只能限制 postfix 可以執行
cd /etc/postfix
chown postfix sasl_passwd*
- 重啟 postfix 服務
systemctl reload postfix
- 測試看是否能正常寄信
echo "Test mail from postfix" | mail -s "Test Postfix" [email protected]
備註
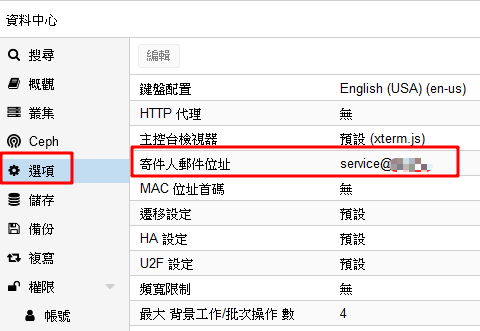
如果想要將 FROM 寄件者的資訊改成服務的帳號的話,可以去資料中心裡面有一個選項,修改寄件者郵件位置

