
Debian \ Ubuntu Client 加入 Univention
BUBU 因現行環境都是以 Debian 為主官方文檔是 Ubuntu 設定為主,加上之前測試有找到有人提供腳本分享方式加入。
官方目前也是有提供加入方式及腳本,但目前只限於 Ubuntu 版本,其他 Linux 版本可以依照官方提供文檔進行修改也是可以正常使用。
運行環境
環境都是在 「Proxmox VE 」 虛擬系統上架設,都是以 「 LXC 」模式為主,除非有特殊狀況會告知使用 「 VM 」 模式
- 系統環境: Debain 11、Ubuntu 2204
設定過程
- 建立一個可執行腳本檔,因 BUBU 都是在文字模式下執行,網路上查到的版本是 GUI 介面,腳本內容只限於文字模式運行,例:
vim ucsjoin.sh
#!/bin/bash

#
#   This script will allow your linux desktop to join a Univention Server domain
#   This will allow you connect to an LDAP,Kerberos,Samba server
#   This was tested on Centos7.5 logging into Univention Server, but might work for other servers too
#
#   https://www.univention.com/
#

# this script was made following this website post
# https://help.univention.com/t/member-server-kerberos-user-authentication/4516/4

#
#   User Edit Section
#
# Set IP of Domain-Controller
# LDAP IP 位置
MASTER_IP=192.168.1.21 # LDAP Server IP
# LDAP 主機連線位置
ldap_master=ucs.abc.com # my DNS to the ldap
# LDAP 網域名稱
ldap_base="dc=abc,dc=com"
# 取得本機名稱
hostname=$(hostname) # set the hostname you want to register with Univention

#~~~~~~~~~~~~~~~~~~~~~~~~~~~~~~~~~~~~~~~~~~~~~~~~~~~~~~~~~~~~~~~~~~~~~~~~~~~~~~~~~~~~~~~~~~~~~
# the rest of this script should just work by it self.
# for an explanation of what this script is doing, go to https://docs.software-univention.de/domain-4.1.html#ext-dom-ubuntu

# Step 0
# install all necessary packages
apt-get -y install sssd libnss-sss libpam-sss libsss-sudo lsb-release slapd

echo " Variables set: going to step 1"

# step 1
# integration into the LDAP directory and SSL certificate authority
echo " Attempting to connect to the LDAP server to obtain certificate"
echo " 連線 Univention 伺服器取得 LDAP 憑證 "
echo " Please enter the password for the root user to the LDAP Server (for copying certs)"
echo " 請輸入 Univention 伺服器 root 密碼(複製憑證) "
echo "     ssh root@${ldap_master} [enter password]"
mkdir /etc/univention
ssh -n root@${MASTER_IP} 'ucr shell | grep -v ^hostname=' >/etc/univention/ucr_master
echo "master_ip=${MASTER_IP}" >>/etc/univention/ucr_master
chmod 660 /etc/univention/ucr_master
. /etc/univention/ucr_master

# add the ldap dns and ip into /etc/hosts
# 增加 UCS 連線位置到 hosts
echo "${MASTER_IP} ${ldap_master}" >>/etc/hosts

echo " step1: complete"
echo ""
echo " step2: starting"

# step 2
# Create account on the server to Gain read access
# 建立帳號並且產生密碼加密到 `/etc/ldap.secret`

# Download the SSL certificate
# 下載 UCS 憑證存在本機上
mkdir -p /etc/univention/ssl/ucsCA/
wget -O /etc/univention/ssl/ucsCA/CAcert.pem \
    http://${ldap_master}/ucs-root-ca.crt

# Create an account and save the password
password="$(tr -dc A-Za-z0-9_ </dev/urandom | head -c20)"
echo "     ssh root@${ldap_master} [enterdevlab.asrc password]"
ssh -n root@${ldap_master} udm computers/linux create \
    --position "cn=computers,${ldap_base}" \
    --set name=$(hostname) --set password="${password}" \
    --set operatingSystem="$(lsb_release -is)" \
    --set operatingSystemVersion="$(lsb_release -rs)"
printf '%s' "$password" >/etc/ldap.secret
chmod 0400 /etc/ldap.secret

echo "step2: complete"
echo ""
echo "step3: starting"

# Step 3
echo "正在設定 LDAP 相關設定"
# Create ldap.conf locally
# 建立 LDAP 設定檔
cat >/etc/ldap/ldap.conf <<__EOF__
TLS_CACERT /etc/univention/ssl/ucsCA/CAcert.pem
URI ldap://$ldap_master:7389
BASE $ldap_base
__EOF__

echo "step3:complete"
echo ""
echo "step4: starting"

# Step 4
echo "正在設定 sssd 相關設定"
# sssd
# 設定 sssd 設定檔
cat >/etc/sssd/sssd.conf <<___EOF___
[sssd]
config_file_version = 2
reconnection_retries = 3
sbus_timeout = 30
services = nss, pam, sudo
domains = $kerberos_realm

[nss]
reconnection_retries = 3

[pam]
reconnection_retries = 3

[domain/$kerberos_realm]
auth_provider = krb5
krb5_kdcip = ${MASTER_IP}
krb5_realm = ${kerberos_realm}
krb5_server = ${ldap_master}
krb5_kpasswd = ${ldap_master}
id_provider = ldap
ldap_uri = ldap://${ldap_master}:7389
ldap_search_base = ${ldap_base}
ldap_tls_reqcert = never
ldap_tls_cacert = /etc/univention/ssl/ucsCA/CAcert.pem
cache_credentials = true
enumerate = true
ldap_default_bind_dn = cn=$(hostname),cn=computers,${ldap_base}
ldap_default_authtok_type = password
ldap_default_authtok = $(cat /etc/ldap.secret)
___EOF___

chmod 600 /etc/sssd/sssd.conf

echo "啟動 sssd 服務"
# 啟動服務
systemctl restart sssd && systemctl enable sssd

# 登入時會自動建立家用目錄
cat >/usr/share/pam-configs/ucs_mkhomedir <<__EOF__
Name: activate mkhomedir
Default: yes
Priority: 900
Session-Type: Additional
Session:
    required    pam_mkhomedir.so umask=0022 skel=/etc/skel
__EOF__

DEBIAN_FRONTEND=noninteractive pam-auth-update --force

# Become root
# 登入後會系統會自動該帳號某些系統
echo '*;*;*;Al0000-2400;audio,cdrom,dialout,floppy,plugdev,adm' \
   >>/etc/security/group.conf

cat >>/usr/share/pam-configs/local_groups <<__EOF__
Name: activate /etc/security/group.conf
Default: yes
Priority: 900
Auth-Type: Primary
Auth:
    required    pam_group.so use_first_pass
__EOF__

DEBIAN_FRONTEND=noninteractive pam-auth-update --force

# Install required packages
# 安裝必要套件
apt-get install -y heimdal-clients ntpdate

# 設定 Kerberos 基本設定檔
# Default krb5.conf
cat >/etc/krb5.conf <<__EOF__
[libdefaults]
    default_realm = ${kerberos_realm}
    kdc_timesync = 1
    ccache_type = 4
    forwardable = true
    proxiable = true
    default_tkt_enctypes = arcfour-hmac-md5 des-cbc-md5 des3-hmac-sha1 des-cbc-crc des-cbc-md4 des3-cbc-sha1 aes128-cts-hmac-sha1-96 aes256-cts-hmac-sha1-96
    permitted_enctypes = des3-hmac-sha1 des-cbc-crc des-cbc-md4 des-cbc-md5 des3-cbc-sha1 arcfour-hmac-md5 aes128-cts-hmac-sha1-96 aes256-cts-hmac-sha1-96
    allow_weak_crypto=true

[realms]
$kerberos_realm = {
    kdc =  ${MASTER_IP}  ${ldap_master}
    admin_server = ${MASTER_IP}  ${ldap_master}
    kpasswd_server = ${MASTER_IP}  ${ldap_master}
}
__EOF__

# Synchronize the time with the UCS system
# 與 UCS 主機同步時間
ntpdate -bu ${ldap_master}

# Test Kerberos: kinit will ask you for a ticket and the SSH login to the master should work with ticket authentication:
# 測試 Kerberos 服務: kinit 會用 SSH 方式與 UCS 主機進行連線測試
kinit Administrator
ssh -n Administrator@${ldap_master} ls /etc/univention

# Destroy the kerberos ticket
kdestroy
- 設定剛剛建立腳本有執行權限
chmod +x ucsjoin.sh
-
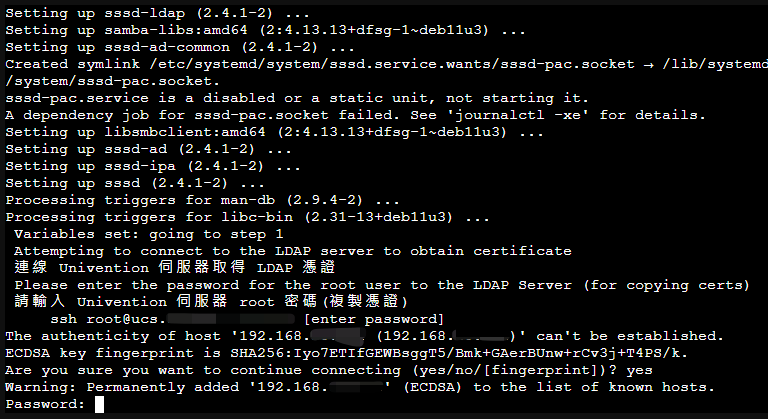
執行剛剛設定腳本,以下動作都是會利用 ssh 方式與 UCS 主機連線溝通取得憑證及相關設定
-
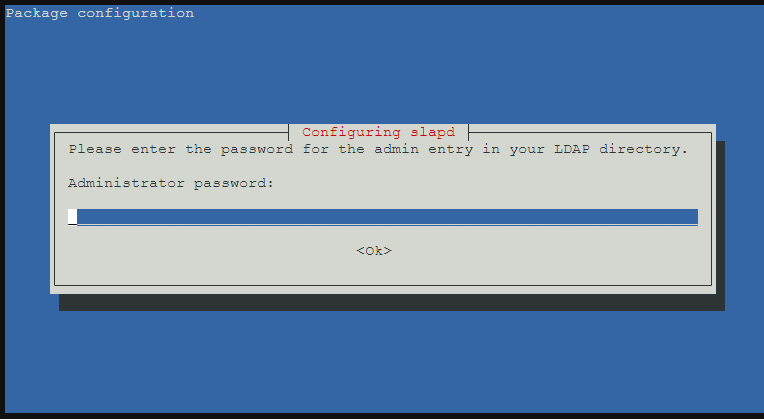
要求輸入 UCS 管理者密碼
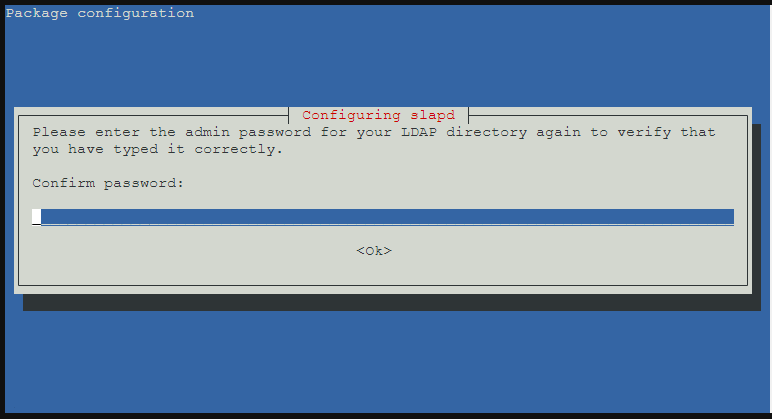
- 再次輸入 UCS 管理者密碼
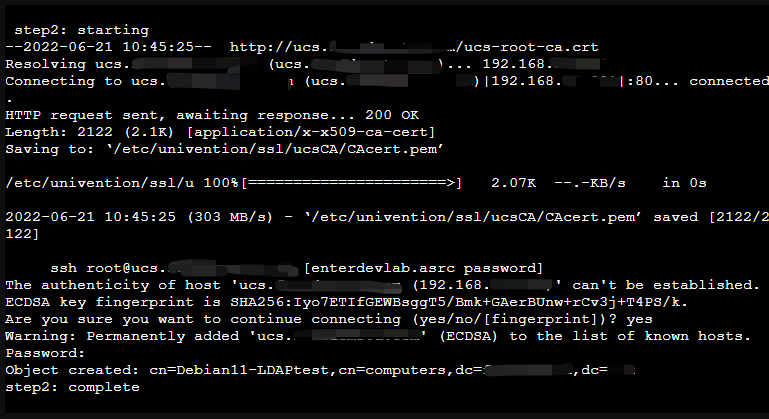
- 使用 IP 方式連線
- 使用 主機名稱 連線及下載 UCS 憑證存在本機
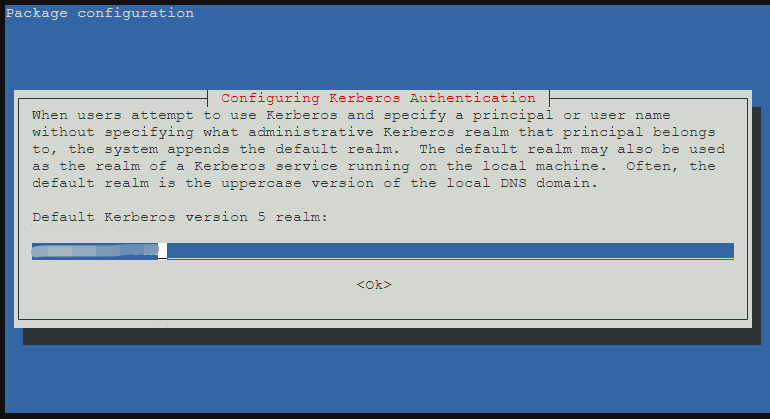
- 設定 Kerberos Client 服設系統會自動帶出您的網域名稱不需修改直接按 OK
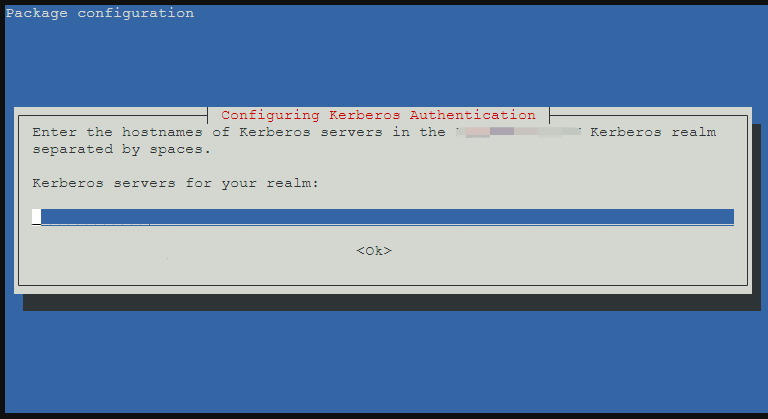
- 輸入 UCS 主機名稱,例:ucs.abc.local
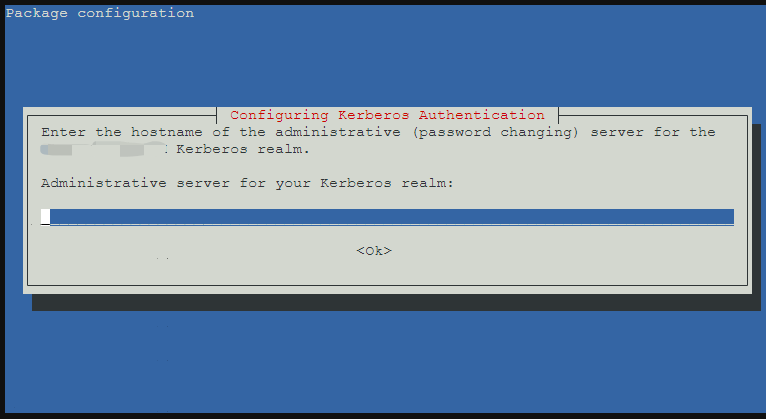
- 一樣輸入 UCS 主機名稱,例:ucs.abc.local
- 最後一步 key 入 UCS 管理者密碼
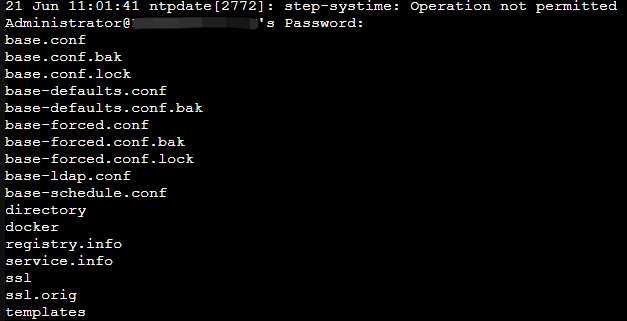
- 進到 UCS 後台查看是否有新增一台設備

- 再利用
getent passwd指令測試是否帳號有同步,以下是在 UCS 上建立帳號查詢結果。

補充說明
BUBU 之前環境都是在 LXC 模式下運行,那在公司是有使用到 KVM 模式一直測試失敗,那後來有逐步逐步的安照腳本步驟設定發現到在取得本機名稱會失敗,因為 BUBU 習慣在取本機名稱後面會加上 xxx.local 關係造成無法取系統想要值,所以站台如果有打算跟 UCS(Univention) 結合應用的話,本機名稱就只要取您想要的名稱後面不要加上 .local 或者其他。