NextCloud 結合 OxOOL Community 線上編輯
昨天去參加台中社群活動,在介紹 OxOffice 的線上操作版本,這個比之前使用 Collabora Online 功能上還要厲害符合在地化操作感,使用上還滿順暢的,目前官方是有兩種版本是商業版及社群版,社群版是足夠使用也沒有線上人數限制使用跟另一套 Collabora Online 版本這一套比較符合企業使用,但是還是會建議如果企業有編列預算的話,還是支持一下該套件服務。
社群版功能若沒有辦法符合企業所使用的功能,可以考慮採買商業版的服務來使用
因這兩個服務都需要各自獨立運作,本工作室測試環境是 CentOS 7
兩套環境為
安裝環境都是在 Proxmox VE 的 CT 版本運行
共同系統: CentOS 7、Nginx 1.17、OpenSSL-1.1.1f、MariaDB 10.4
NextCloud:PHP 7.3
OxOOL Community :只需要 Web 服務
NextCloud 安裝流程
Nginx
可以參考本工作室的之前寫的文章 啟用Nginx 支援到 OpenSSL TLS1.3 安全協定
MariaDB 安裝
- 首先新增加 MariaDB.repo 官方載點
新增加MariaDB安裝檔
vim /etc/yum.repos.d/MariaDB.repo

再填入內容為以下

# MariaDB 10.4 CentOS repository list - created 2019-12-03 02:20 UTC
# http://downloads.mariadb.org/mariadb/repositories/
[mariadb]
name = MariaDB
baseurl = http://yum.mariadb.org/10.4/centos7-amd64
gpgkey=https://yum.mariadb.org/RPM-GPG-KEY-MariaDB
gpgcheck=1

增加完畢後在下命令安裝

yum install MariaDB-server MariaDB-client -y
- 資料庫安裝及設定
systemctl start mariadb ; systemctl enable mariadb   # 啟動資料庫服
mysql_secure_installation   # 設定資料庫的root密碼

NOTE: RUNNING ALL PARTS OF THIS SCRIPT IS RECOMMENDED FOR ALL MariaDB
      SERVERS IN PRODUCTION USE!  PLEASE READ EACH STEP CAREFULLY!

In order to log into MariaDB to secure it, we'll need the current
password for the root user.  If you've just installed MariaDB, and
you haven't set the root password yet, the password will be blank,
so you should just press enter here.

Enter current password for root (enter for none): 第一次設定,直接按 Enter 鍵即可
OK, successfully used password, moving on...

Setting the root password ensures that nobody can log into the MariaDB
root user without the proper authorisation.

Set root password? [Y/n] 按 Y 設定資料庫 root 密碼
New password: 輸入新密碼
Re-enter new password: 再次輸入新密碼
Password updated successfully!
Reloading privilege tables..
 ... Success!


By default, a MariaDB installation has an anonymous user, allowing anyone
to log into MariaDB without having to have a user account created for
them.  This is intended only for testing, and to make the installation
go a bit smoother.  You should remove them before moving into a
production environment.

Remove anonymous users? [Y/n] 按 Y 移除anonymous users
 ... Success!

Normally, root should only be allowed to connect from 'localhost'.  This
ensures that someone cannot guess at the root password from the network.

Disallow root login remotely? [Y/n] 按 Y 關閉 root 遠端登入
 ... Success!

By default, MariaDB comes with a database named 'test' that anyone can
access.  This is also intended only for testing, and should be removed
before moving into a production environment.

Remove test database and access to it? [Y/n] 按 Y 移除資料表 test
 - Dropping test database...
 ... Success!
 - Removing privileges on test database...
 ... Success!

Reloading the privilege tables will ensure that all changes made so far
will take effect immediately.

Reload privilege tables now? [Y/n] 按 Y 重新載入資料表權限
 ... Success!

Cleaning up...

All done!  If you've completed all of the above steps, your MariaDB
installation should now be secure.

Thanks for using MariaDB!

mysql -u root -p   # 登入資料庫裡設定資表及權限

CREATE DATABASE IF NOT EXISTS nextcloud_db DEFAULT CHARACTER SET utf8 COLLATE utf8_general_ci; #在資料庫裡新增nextcloud_db表單
GRANT ALL PRIVILEGES ON nextcloud_db.* TO 'nextclouduser'@'localhost' IDENTIFIED BY 'password' WITH GRANT OPTION; #密碼請自己輸入好記錄的密碼
FLUSH PRIVILEGES;
quit
- PHP 7.3
- 先安裝額外的套件及載點
yum install -y epel-release yum-utils
- 因內鍵預設版本是 PHP 5.4 因此本版官方已不在維護,建議直接安裝當時官方所提供主要版本,現在安裝版本是 PHP 7.3
rpm -Uvh http://rpms.famillecollet.com/enterprise/remi-release-7.rpm
yum-config-manager --disable remi-php54
yum-config-manager --enable remi-php73
- 安裝 PHP 套件
yum install -y php php-mysqlnd php-pdo php-xml php-pear php-devel php-mbstring re2c gcc-c++ gcc \
php-fpm php-mysql php-gd php-cli php-json php-opcache php-curl php-ldap php-odbc php-xmlrpc php-soap \
curl curl-devel php-intl php-zip php-pecl-apcu-devel php-pecl-apcu php-mcrypt php-common php-process \
php-pecl-redis php-pecl-imagick
- 安裝好 PHP 要去修改 「
vim /etc/php.ini」 設定檔
修改前
;cgi.fix_pathinfo=1
修改後
cgi.fix_pathinfo=0
修改時區
[Date]
修改前
;date.timezone =
修改後
date.timezone = Asia/Taipei
修改資料上傳限制
; 上傳檔案大小上限(單一檔案大小)
upload_max_filesize = 50M

; POST 大小上限(所有檔案大小加總)
post_max_size = 200M

; 記憶體用量上限
memory_limit = 512M

; Script執行時間上限(單位:秒)
max_execution_time = 600

; Script處理資料時間上限(單位:秒)
max_input_time = 600

; Socket無回應斷線時間(單位:秒)
default_socket_timeout = 600

存檔
:wq
- 設定「php-fpm」「
vim /etc/php-fpm.d/www.conf」
由誰使用此服務
; RPM: apache user chosen to provide access to the same directories as httpd
;user = apache
user = nginx
; RPM: Keep a group allowed to write in log dir.
;group = apache
group =nginx

; Set permissions for unix socket, if one is used. In Linux, read/write
; permissions must be set in order to allow connections from a web server.
; Default Values: user and group are set as the running user
;                 mode is set to 0660
listen.owner = nginx
listen.group = nginx
;listen.mode = 0660

env[HOSTNAME] = $HOSTNAME
env[PATH] = /usr/local/bin:/usr/bin:/bin
env[TMP] = /tmp
env[TMPDIR] = /tmp
env[TEMP] = /tmp

php_value[session.save_path]    = /var/www/html/sessions

修改好存檔
:wq
- 重啟及開機自動啟動 php-fpm 服務
systemctl restart php-fpm ; systemctl enable php-fpm
- 建立目錄
mkdir /var/www/html/sessions
chown -R nginx:nginx /var/www/html/sessions
Nginx 服務設定檔
全域設定
user nginx;
worker_processes auto;
error_log /var/log/nginx/error.log;
pid /run/nginx.pid;
include /usr/share/nginx/modules/*.conf;
#
events {
    worker_connections 1024;
}
#
http {
    log_format main  '$remote_addr - $remote_user [$time_local] "$request" '
                      '$status $body_bytes_sent "$http_referer" '
                      '"$http_user_agent" "$http_x_forwarded_for"';
#
    access_log /var/log/nginx/access.log  main;
#
    server_tokens off;
#
    resolver 168.95.1.1 8.8.8.8 1.1.1.1 valid=300s;
    resolver_timeout 5s;
#
# Restoring the original visitor IP for your web application
    set_real_ip_from 127.0.0.1;
# use any of the following two
# real_ip_header CF-Connecting-IP;
    real_ip_header X-Forwarded-For;
#
# Default is 60, May need to be increased for very large uploads
#
    sendfile on;
#
    tcp_nopush on;
    tcp_nodelay on;
    keepalive_timeout 65;
    types_hash_max_size 2048;
# set max upload size
    client_max_body_size 1G;
    fastcgi_buffers 64 4K;
# Enable gzip but do not remove ETag headers
    gzip on;
    gzip_vary on;
    gzip_comp_level 4;
    gzip_min_length 256;
    gzip_proxied expired no-cache no-store private no_last_modified no_etag auth;
    gzip_types application/atom+xml application/javascript application/json application/ld+json application/manifest+json application/rss+xml application/vnd.geo+json application/vnd.ms-fontobject application/x-font-ttf application/x-web-app-manifest+json application/xhtml+xml application/xml font/opentype image/bmp image/svg+xml image/x-icon text/cache-manifest text/css text/plain text/vcard text/vnd.rim.location.xloc text/vtt text/x-component text/x-cross-domain-policy;
#
#開啟Brotli壓縮
    brotli on;
#壓縮等級,0 到 11,默認值是 6,過大會額外消耗服務器CPU
    brotli_comp_level 6;
#設置需要進行壓縮的最小響應大小,單位為字節
    brotli_min_length 512;
#指定哪些MIME類型進行壓縮
    brotli_types text/plain text/javascript text/css text/xml text/x-component application/javascript application/x-javascript application/xml application/json application/xhtml+xml application/rss+xml application/atom+xml application/x-font-ttf application/vnd.ms-fontobject image/svg+xml image/x-icon font/opentype;
#是否允許查找預處好的、以 .br 结尾的壓缩文件。可選值為 on、off、always
    brotli_static always;
#
    include /etc/nginx/mime.types;
    include /etc/nginx/conf.d/*.conf;
#
    default_type application/octet-stream;
}
服務設定
upstream php-handler {
    server 127.0.0.1:9000;
}
#
server {
    listen 80;
    server_name 您的網域;
    rewrite ^(.*)$ https://${server_name}$1 permanent;
}
#
server {
    listen 443 ssl http2;
    listen [::]:443 ssl http2;
    server_name 您的網域;
    root /var/www/html/nextcloud;
#
# certs sent to the client in SERVER HELLO are concatenated in ssl_certificate
#
    ssl_certificate /etc/nginx/ssl/fullchain.pem;
    ssl_certificate_key /etc/nginx/ssl/privkey.pem;
    ssl_session_timeout 1d;
    ssl_session_cache shared:SSL:50m;
    ssl_session_tickets on;
#
# intermediate configuration. tweak to your needs.
#
    ssl_protocols TLSv1.3 TLSv1.2 TLSv1.1;
    ssl_ciphers 'TLS13-AES-256-GCM-SHA384:TLS13-CHACHA20-POLY1305-SHA256:TLS13-AES-128-GCM-SHA256:TLS13-AES-128-CCM-8-SHA256:TLS13-AES-128-CCM-SHA256:EECDH+CHACHA20:EECDH+CHACHA20-draft:EECDH+ECDSA+AES128:EECDH+aRSA+AES128:RSA+AES128:EECDH+ECDSA+AES256:EECDH+aRSA+AES256:RSA+AES256:EECDH+ECDSA+3DES:EECDH+aRSA+3DES:RSA+3DES:!MD5';
    ssl_prefer_server_ciphers on;
#
    access_log /var/log/nginx/nc_access.log;
    error_log /var/log/nginx/nc_error.log;
#
#
# Add headers to serve security related headers
# Before enabling Strict-Transport-Security headers please read into this
# topic first.
#add_header Strict-Transport-Security "max-age=15768000; includeSubDomains; preload;";
#
# WARNING: Only add the preload option once you read about
# the consequences in https://hstspreload.org/. This option
# will add the domain to a hardcoded list that is shipped
# in all major browsers and getting removed from this list
# could take several months.
    add_header X-Content-Type-Options nosniff;
    add_header X-XSS-Protection "1; mode=block";
    add_header X-Robots-Tag none;
    add_header X-Download-Options noopen;
    add_header X-Permitted-Cross-Domain-Policies none;
    add_header Referrer-Policy no-referrer;
    add_header X-Frame-Options SAMEORIGIN;
# Remove X-Powered-By, which is an information leak
    fastcgi_hide_header X-Powered-By;
#
    location = /robots.txt {
        allow all;
        log_not_found off;
        access_log off;
    }
# The following 2 rules are only needed for the user_webfinger app.
# Uncomment it if you're planning to use this app.
#rewrite ^/.well-known/host-meta /public.php?service=host-meta last;
#rewrite ^/.well-known/host-meta.json /public.php?service=host-meta-json
# last;
    location = /.well-known/carddav {
        return 301 $scheme://$host:$server_port/remote.php/dav;
    }
    location = /.well-known/caldav {
        return 301 $scheme://$host:$server_port/remote.php/dav;
    }
# Uncomment if your server is build with the ngx_pagespeed module
# This module is currently not supported.
#pagespeed off;
#
    location / {
        rewrite ^ /index.php;
    }
    location ~ ^\/(?:build|tests|config|lib|3rdparty|templates|data)\/ {
        deny all;
    }
    location ~ ^\/(?:\.|autotest|occ|issue|indie|db_|console) {
        deny all;
    }
    location ~ ^\/(?:index|remote|public|cron|core\/ajax\/update|status|ocs\/v[12]|updater\/.+|oc[ms]-provider\/.+)\.php(?:$|\/) {
        fastcgi_split_path_info ^(.+?\.php)(\/.*|)$;
        try_files $fastcgi_script_name =404;
        include fastcgi_params;
        fastcgi_param SCRIPT_FILENAME $document_root$fastcgi_script_name;
        fastcgi_param PATH_INFO $fastcgi_path_info;
        fastcgi_param HTTPS on;
# Avoid sending the security headers twice
        fastcgi_param modHeadersAvailable true;
# Enable pretty urls
        fastcgi_param front_controller_active true;
        fastcgi_pass php-handler;
        fastcgi_intercept_errors on;
        fastcgi_request_buffering off;
    }
    location ~ ^\/(?:updater|oc[ms]-provider)(?:$|\/) {
        try_files $uri/ =404;
        index index.php;
    }
# Adding the cache control header for js, css and map files
# Make sure it is BELOW the PHP block
    location ~ \.(?:css|js|woff2?|svg|gif|map)$ {
        try_files $uri /index.php$request_uri;
        add_header Cache-Control "public, max-age=15778463";
# Add headers to serve security related headers (It is intended to
# have those duplicated to the ones above)
# Before enabling Strict-Transport-Security headers please read into
# this topic first.
#add_header Strict-Transport-Security "max-age=15768000; includeSubDomains; preload;";
#
# WARNING: Only add the preload option once you read about
# the consequences in https://hstspreload.org/. This option
# will add the domain to a hardcoded list that is shipped
# in all major browsers and getting removed from this list
# could take several months.
        add_header X-Content-Type-Options nosniff;
        add_header X-XSS-Protection "1; mode=block";
        add_header X-Robots-Tag none;
        add_header X-Download-Options noopen;
        add_header X-Permitted-Cross-Domain-Policies none;
        add_header Referrer-Policy no-referrer;
        add_header X-Frame-Options SAMEORIGIN;
# Optional: Don't log access to assets
        access_log off;
    }
    location ~ \.(?:png|html|ttf|ico|jpg|jpeg)$ {
        try_files $uri /index.php$request_uri;
# Optional: Don't log access to other assets
        access_log off;
    }
}
代理設定檔
server {
    listen 80;
    server_name 您的網域;
    rewrite ^(.*)$ https://${server_name}$1 permanent;
}
#
server {
# 使用 https 和 http/2 協定
    listen 443 ssl http2;
# 上述的 IPv6 方式
    listen [::]:443 ssl http2;
    server_name 您的網域;
#
# certs sent to the client in SERVER HELLO are concatenated in ssl_certificate
#
# SSL 憑證證書路徑
    ssl_certificate /etc/nginx/ssl/fullchain.pem;
# 私鑰路徑
    ssl_certificate_key /etc/nginx/ssl/privkey.pem;
# 緩存有效期
    ssl_session_timeout 1d;
# 緩存憑證類型和大小
    ssl_session_cache shared:SSL:50m;
#
# intermediate configuration. tweak to your needs.
#
# 使用的加密協定
    ssl_protocols TLSv1.3 TLSv1.2 TLSv1.1;
# 加密演算法,越前面的優先級越高
    ssl_ciphers 'TLS13-AES-256-GCM-SHA384:TLS13-CHACHA20-POLY1305-SHA256:TLS13-AES-128-GCM-SHA256:TLS13-AES-128-CCM-8-SHA256:TLS13-AES-128-CCM-SHA256:EECDH+CHACHA20:EECDH+CHACHA20-draft:EECDH+ECDSA+AES128:EECDH+aRSA+AES128:RSA+AES128:EECDH+ECDSA+AES256:EECDH+aRSA+AES256:RSA+AES256:EECDH+ECDSA+3DES:EECDH+aRSA+3DES:RSA+3DES:!MD5';
# 交握過程使用 Server 的首選加演算法,這裡使用 Client 為首選
    ssl_prefer_server_ciphers on;
#
    access_log /var/log/nginx/nc_access.log;
    error_log /var/log/nginx/nc_error.log;
#
    location /.well-known/carddav {
        return 301 $scheme://$host/remote.php/dav;
    }
    location /.well-known/caldav {
        return 301 $scheme://$host/remote.php/dav;
    }
#
    location / {
        proxy_pass https://服務主機位置;
        proxy_next_upstream error timeout invalid_header http_500 http_502 http_503;
        proxy_set_header Host $host;
        proxy_set_header X-Real_IP $remote_addr;
        proxy_set_header X-Forwarded-For $proxy_add_x_forwarded_for;
        proxy_set_header X-Forwarded-Proto $scheme;
        add_header Strict-Transport-Security "max-age=31536000; includeSubDomains; preload";
        client_max_body_size 0;
        proxy_redirect off;
        proxy_pass_header Authorization;
    }
#
    location ~* \.(?:ogg|ogv|svg|svgz|eot|otf|woff|mp4|ttf|css|rss|atom|js|jpg|jpeg|gif|png|ico|zip|tgz|gz|rar|bz2|doc|xls|exe|ppt|tar|mid|midi|wav|bmp|rtf)$ {
        proxy_pass https://服務主機位置;
    }

}
Nextcloud 安裝
- 首先到官方網站 下載
cd /var/www/html

wget https://download.nextcloud.com/server/releases/nextcloud-16.0.3.tar.bz2

解壓
tar -jxvf nextcloud-16.0.3.tar.bz2

建立 data 目錄
mkdir nextcloud/data

權限
chown -R nginx:nginx nextcloud
- 因 BUBU 在重新安裝一次發現到有這樣子的問題,要在 NextCloud 設定檔設定
vim /var/www/html/nextcloud/config/config.php,這裡要新增加信任的網域及內網的 IP,如果未來有設要跟 NextCloud 結合會建在這裡增網域及 IP
  'trusted_domains' =>
  array (
    0 => '[sub.domain].com',
    1 => '192.168.1.41',
  ),
- 接下在瀏灠器上輸入
https://您的服務網址 - 新增管理者的帳號及密碼,再選擇下面的儲存空間和資料庫,預設是
SQLite版本,我們要修改成MariaDB版本

- 選擇
MySQL/MariaDB

- 輸入連資料庫的帳號、密碼及要連接的資料庫名稱
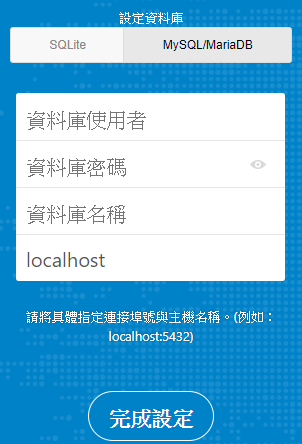
- 填入完成之後,按下完成設定,系統就會開始建置服務
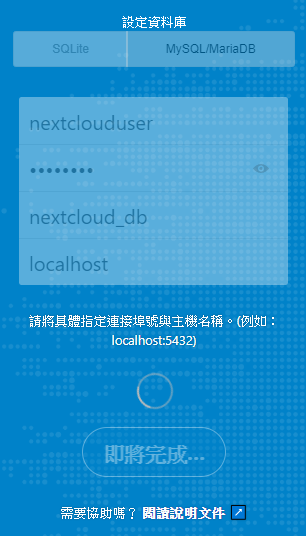
- 成功建置完服務會自動導到
NexctCloud的頁面
參考相關網頁
- 官方網站
- centos7上用nginx安装nextcloud(PHP72)
- CentOS 7使用Nginx+MariaDB+PHP安装Nextcloud 13
- Nextcloud:系統詳細設定
- Multiple domains reverse SSL proxy 官方文檔
- Nginx configuration 官方文檔
- How to Install Nextcloud with Nginx and PHP7-FPM on CentOS 7
- CentOS 7 安裝 Nextcloud + Collabora Office
- Urgent security issue in NGINX/php-fpm
- Check Reverse Proxy Config
OxOOL Community 安裝流程
Nginx
- 請參考本工作室之前所寫的 啟用Nginx 支援到 OpenSSL TLS1.3 安全協定
OxOOL Community 設定安裝
- 首先到官網 下載 參考安裝流程
1. 安裝必要的套件服務
yum install sudo vim net-tools unzip wget -y

2. 進到來源庫目錄
cd /etc/yum.repos.d

3. 下載官方所提供來源庫的設定檔
wget --no-check-certificate https://demo.oxoffice.com.tw/yum.repo/oxool-community.repo

4. 更新來源庫
yum update -y

5. 開始安裝 OxOOL 服務
yum groupinstall "OxOOL Community Group" -y
OxOOL 設定檔
vim /etc/oxool/oxool.xml

憑證設定
<ssl desc="SSL settings">
        <enable type="bool" desc="Controls whether SSL encryption is enable (do not disable for production deployment). If default is false, must first be compiled with SSL support to enable." default="true">true</enable>
        <termination desc="Connection via proxy where oxoolwsd acts as working via https, but actually uses http." type="bool" default="true">false</termination>
        <cert_file_path desc="Path to the cert file" relative="false">/etc/nginx/ssl/fullchain.pem</cert_file_path> ----修改憑證路徑
        <key_file_path desc="Path to the key file" relative="false">/etc/nginx/ssl/privkey.pem</key_file_path> ----修改憑證路徑
        <ca_file_path desc="Path to the ca file" relative="false"></ca_file_path> ----刪除路徑
        <cipher_list desc="List of OpenSSL ciphers to accept" default="ALL:!ADH:!LOW:!EXP:!MD5:@STRENGTH"></cipher_list>
        <hpkp desc="Enable HTTP Public key pinning" enable="false" report_only="false">
            <max_age desc="HPKP's max-age directive - time in seconds browser should remember the pins" enable="true">1000</max_age>
            <report_uri desc="HPKP's report-uri directive - pin validation failure are reported at this URL" enable="false"></report_uri>
            <pins desc="Base64 encoded SPKI fingerprints of keys to be pinned">
            <pin></pin>
            </pins>
        </hpkp>
    </ssl>

信任網域
<storage desc="Backend storage">
        <filesystem allow="false" />
        <wopi desc="Allow/deny wopi storage. Mutually exclusive with webdav." allow="true">
            <host desc="Regex pattern of hostname to allow or deny." allow="true">localhost</host>
            <host desc="Regex pattern of hostname to allow or deny." allow="true">nc\.xxx\.com</host> #增加您的hostname或是IP,這個IP或是hostname是WOPI Server(也就是Nextcloud的所在IP)
            <host desc="Regex pattern of hostname to allow or deny." allow="true">192\.168\.[0-9]{1,3}\.[0-9]{1,3}</host>
            <host desc="Regex pattern of hostname to allow or deny." allow="false">192\.168\.1\.1</host>

            <max_file_size desc="Maximum document size in bytes to load. 0 for unlimited." type="uint">0</max_file_size>
        </wopi>
        <webdav desc="Allow/deny webdav storage. Mutually exclusive with wopi." allow="false">
            <host desc="Hostname to allow" allow="false">localhost</host>
        </webdav>
    </storage>

網頁管理者帳號設定
    <admin_console desc="Web admin console settings.">
        <enable desc="Enable the admin console functionality" type="bool" default="true">true</enable>
        <enable_pam desc="Enable admin user authentication with PAM" type="bool" default="false">false</enable_pam>
        <username desc="The username of the admin console. Ignored if PAM is enabled.">username</username>
        <password desc="The password of the admin console. Deprecated on most platforms. Instead, use PAM or loolconfig to set up a secure password.">password</password>
    </admin_console>
- 設定完重啟服務
systemctl restart oxool && systemctl enable oxool
Nginx 設定檔
全域設定
user nginx;
worker_processes auto;
error_log /var/log/nginx/error.log;
pid /run/nginx.pid;
include /usr/share/nginx/modules/*.conf;
#
events {
    worker_connections 1024;
}
#
http {
    log_format main  '$remote_addr - $remote_user [$time_local] "$request" '
                      '$status $body_bytes_sent "$http_referer" '
                      '"$http_user_agent" "$http_x_forwarded_for"';
#
    access_log /var/log/nginx/access.log  main;
#
    server_tokens off;
#
    resolver 168.95.1.1 8.8.8.8 1.1.1.1 valid=300s;
    resolver_timeout 5s;
#
# Restoring the original visitor IP for your web application
    set_real_ip_from 127.0.0.1;
# use any of the following two
# real_ip_header CF-Connecting-IP;
    real_ip_header X-Forwarded-For;
#
# Default is 60, May need to be increased for very large uploads
#
    sendfile on;
#
    tcp_nopush on;
    tcp_nodelay on;
    keepalive_timeout 65;
    types_hash_max_size 2048;
# set max upload size
    client_max_body_size 512M;
    fastcgi_buffers 64 4K;
# Enable gzip but do not remove ETag headers
    gzip on;
    gzip_vary on;
    gzip_comp_level 4;
    gzip_min_length 256;
    gzip_proxied expired no-cache no-store private no_last_modified no_etag auth;
    gzip_types application/atom+xml application/javascript application/json application/ld+json application/manifest+json application/rss+xml application/vnd.geo+json application/vnd.ms-fontobject application/x-font-ttf application/x-web-app-manifest+json application/xhtml+xml application/xml font/opentype image/bmp image/svg+xml image/x-icon text/cache-manifest text/css text/plain text/vcard text/vnd.rim.location.xloc text/vtt text/x-component text/x-cross-domain-policy;
#
#開啟Brotli壓縮
    brotli on;
#壓縮等級,0 到 11,默認值是 6,過大會額外消耗服務器CPU
    brotli_comp_level 6;
#設置需要進行壓縮的最小響應大小,單位為字節
    brotli_min_length 512;
#指定哪些MIME類型進行壓縮
    brotli_types text/plain text/javascript text/css text/xml text/x-component application/javascript application/x-javascript application/xml application/json application/xhtml+xml application/rss+xml application/atom+xml application/x-font-ttf application/vnd.ms-fontobject image/svg+xml image/x-icon font/opentype;
#是否允許查找預處好的、以 .br 结尾的壓缩文件。可選值為 on、off、always
    brotli_static always;
#
    include /etc/nginx/mime.types;
    include /etc/nginx/conf.d/*.conf;
#
    default_type application/octet-stream;
}
服務設定
server {
    listen 80;
    server_name 您的網域;
    rewrite ^(.*)$ https://${server_name}$1 permanent;
}
#
server {
    listen 443 ssl http2;
    listen [::]:443 ssl http2;
    server_name 您的網域;
#
# certs sent to the client in SERVER HELLO are concatenated in ssl_certificate
#
    ssl_certificate /etc/nginx/ssl/fullchain.pem;
    ssl_certificate_key /etc/nginx/ssl/privkey.pem;
    ssl_session_timeout 1d;
    ssl_session_cache shared:SSL:50m;
    ssl_session_tickets off;
#
# intermediate configuration. tweak to your needs.
#
    ssl_protocols TLSv1.3 TLSv1.2 TLSv1.1;
    ssl_ciphers 'TLS13-AES-256-GCM-SHA384:TLS13-CHACHA20-POLY1305-SHA256:TLS13-AES-128-GCM-SHA256:TLS13-AES-128-CCM-8-SHA256:TLS13-AES-128-CCM-SHA256:EECDH+CHACHA20:EECDH+CHACHA20-draft:EECDH+ECDSA+AES128:EECDH+aRSA+AES128:RSA+AES128:EECDH+ECDSA+AES256:EECDH+aRSA+AES256:RSA+AES256:EECDH+ECDSA+3DES:EECDH+aRSA+3DES:RSA+3DES:!MD5';
    ssl_prefer_server_ciphers on;
    ssl_stapling on;
    ssl_stapling_verify on;
#
    access_log /var/log/nginx/oc_access.log;
    error_log /var/log/nginx/oc_error.log;
#
    client_max_body_size 1G;
    fastcgi_buffers 64 4K;
#
  # Static files
  location ^~ /loleaflet {
    proxy_pass https://127.0.0.1:9980;
    proxy_set_header Host $http_host;
  }

  # WOPI discovery URL
  location ^~ /hosting/discovery {
    proxy_pass https://127.0.0.1:9980;
    proxy_set_header Host $http_host;
  }

  # Capabilities
  location ^~ /hosting/capabilities {
    proxy_pass https://localhost:9980;
    proxy_set_header Host $http_host;
  }

  # Main websocket
  location ~ ^/lool/(.*)/ws$ {
    proxy_pass https://127.0.0.1:9980;
    proxy_set_header Upgrade $http_upgrade;
    proxy_set_header Connection "Upgrade";
    proxy_set_header Host $http_host;
    proxy_read_timeout 36000s;
  }

  # Download, presentation and image upload
  location ~ ^/lool {
    proxy_pass https://127.0.0.1:9980;
    proxy_set_header Host $http_host;
  }

  # Admin Console websocket
  location ^~ /lool/adminws {
    proxy_pass https://127.0.0.1:9980;
    proxy_set_header Upgrade $http_upgrade;
    proxy_set_header Connection "Upgrade";
    proxy_set_header Host $http_host;
    proxy_read_timeout 36000s;
  }

  # 可以自行查看是否有安裝看成功,如果有會顯示 ok ,如果有對外公開的話會建議在這裡限制來源的 ip
   location /{
    allow 127.0.0.1;
    deny all;
    proxy_pass https://127.0.0.1:9980;
  }
}
代理設定
server {
    listen 80;
    server_name 您的網域;
    rewrite ^(.*)$ https://${server_name}$1 permanent;
}
#
server {
# 使用 https 和 http/2 協定
    listen 443 ssl http2;
# 上述的 IPv6 方式
    listen [::]:443 ssl http2;
    server_name 您的網域;
#
# certs sent to the client in SERVER HELLO are concatenated in ssl_certificate
#
# SSL 憑證證書路徑
    ssl_certificate /etc/nginx/ssl/fullchain.pem;
# 私鑰路徑
    ssl_certificate_key /etc/nginx/ssl/privkey.pem;
# 緩存有效期
    ssl_session_timeout 1d;
# 緩存憑證類型和大小
    ssl_session_cache shared:SSL:50m;
#
# intermediate configuration. tweak to your needs.
#
# 使用的加密協定
    ssl_protocols TLSv1.3 TLSv1.2 TLSv1.1;
# 加密演算法,越前面的優先級越高
    ssl_ciphers 'TLS13-AES-256-GCM-SHA384:TLS13-CHACHA20-POLY1305-SHA256:TLS13-AES-128-GCM-SHA256:TLS13-AES-128-CCM-8-SHA256:TLS13-AES-128-CCM-SHA256:EECDH+CHACHA20:EECDH+CHACHA20-draft:EECDH+ECDSA+AES128:EECDH+aRSA+AES128:RSA+AES128:EECDH+ECDSA+AES256:EECDH+aRSA+AES256:RSA+AES256:EECDH+ECDSA+3DES:EECDH+aRSA+3DES:RSA+3DES:!MD5';
# 交握過程使用 Server 的首選加演算法,這裡使用 Client 為首選
    ssl_prefer_server_ciphers on;
#
    access_log /var/log/nginx/oc_access.log;
    error_log /var/log/nginx/oc_error.log;
#
  # Static files
  location ^~ /loleaflet {
    proxy_pass https://您的服務主機:9980;
    proxy_set_header Host $http_host;
  }

  # WOPI discovery UR
  location ^~ /hosting/discovery {
    proxy_pass https://您的服務主機:9980;
    proxy_set_header Host $http_host;
  }

  # Capabilities
  location ^~ /hosting/capabilities {
    proxy_pass https://您的服務主機:9980;
    proxy_set_header Host $http_host;
  }

  # Main websocket
  location ~ ^/lool/(.*)/ws$ {
    proxy_pass https://您的服務主機:9980;
    proxy_set_header Upgrade $http_upgrade;
    proxy_set_header Connection "Upgrade";
    proxy_set_header Host $http_host;
    proxy_read_timeout 36000s;
  }

  # Download, presentation and image upload
  location ~ ^/lool {
    proxy_pass https://您的服務主機:9980;
    proxy_set_header Host $http_host;
  }

  # Admin Console websocket
  location ^~ /lool/adminws {
    proxy_pass https://您的服務主機:9980;
    proxy_set_header Upgrade $http_upgrade;
    proxy_set_header Connection "Upgrade";
    proxy_set_header Host $http_host;
    proxy_read_timeout 36000s;
  }

  # 可以自行查看是否有安裝看成功,如果有會顯示 ok ,如果有對外公開的話會建議在這裡限制來源的 ip
   location /{
   	allow 127.0.0.1;
    deny all;
    proxy_pass https://您的服務主機:9980;
  }
}
-
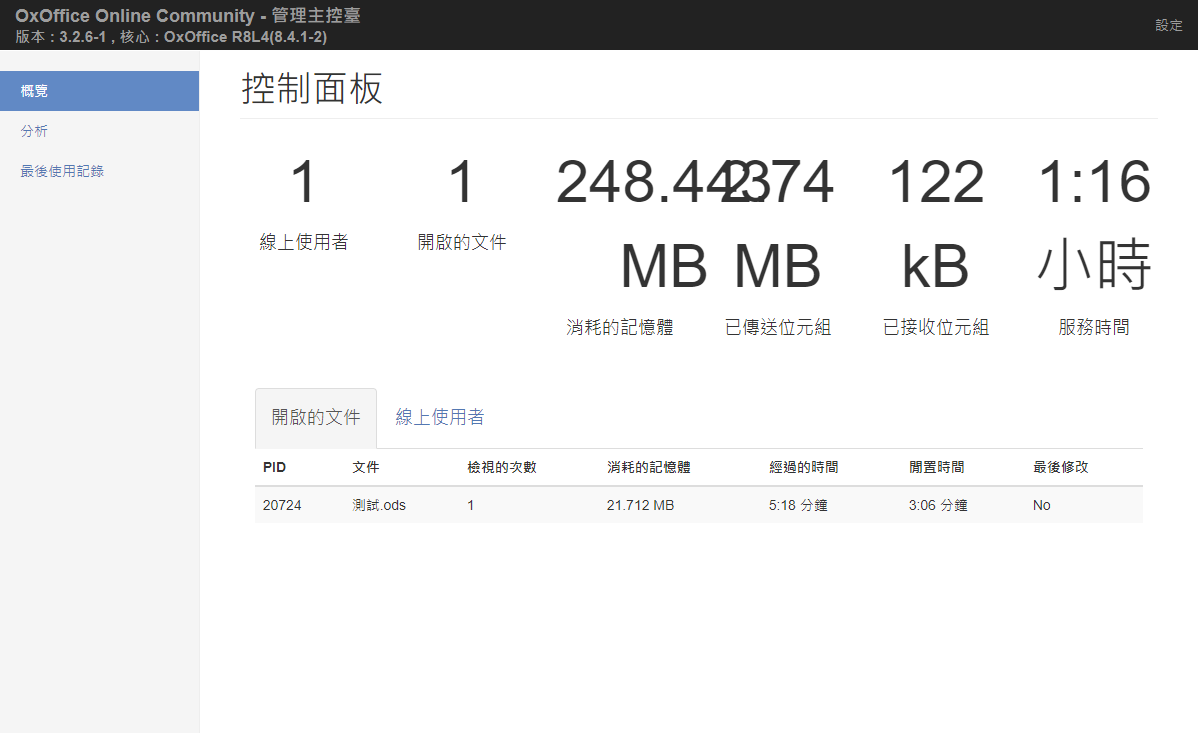
檢視看 OxOOL Community 運作狀態 「
https://你的網域/loleaflet/dist/admin/admin.html」會要求輸入帳號密碼登入後畫面如下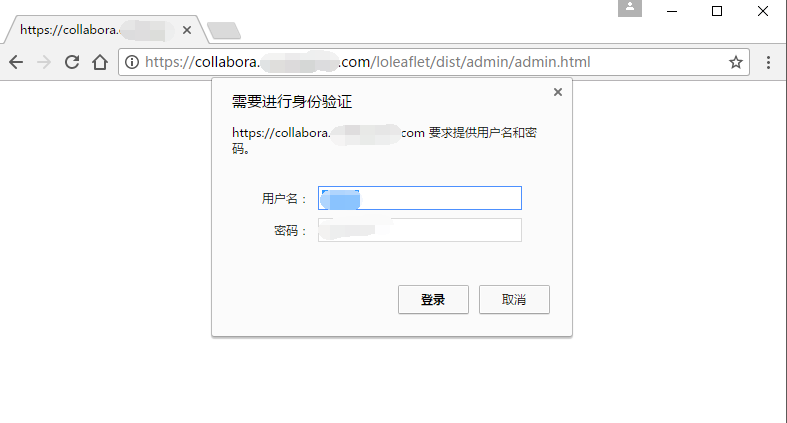
-
登入後畫面


NextCloud 結合 OxOOL Community 設定
因 NextCloud 還尚未有 OxOOL 套件服務,所以需手動下指令安裝,這個在官方有進行教學或參考本篇做法
1. 先進到目前網頁所放置目錄
cd /var/www/html

2. 在此目前下載官方所提供壓縮檔
wget --no-check-certificate https://github.com/nextcloud/richdocuments/releases/download/v3.5.2/richdocuments.tar.gz

3. 解壓縮剛剛下載好的檔案,並且放置 NextCloud 所指定的目錄下
tar zxvf richdocuments.tar.gz -C /var/www/html/nextcloud/apps/

4. 如果不確認確認是否有被修改到的話,可以再下一次該目錄的權限
chown nginx.nginx nextcloud -R
上以都設定完好了,再進到 NextCloud 服務,下載 Collabra Online 套件服務並且啟用
再進入到指令模式下在修改該一些設定就可以正常運行了
1. 一樣進到 NextCloud 目錄
cd /var/www/html/nextcloud

2. 填入 OxOOL 的服務主機,如果你是提供外網服務的話,在 --value="https://yourhostname" ,沒有的話就設定如下
sudo -u nginx php occ config:app:set richdocuments wopi_url --value="http://yourhostip:9980"
設定完之後再進入 NextCloud 服務會顯示出設定檔檔有修改過,需要做更新,更新完之後就可以正常運行了,之後如果有機會會將畫面截圖下來
測試
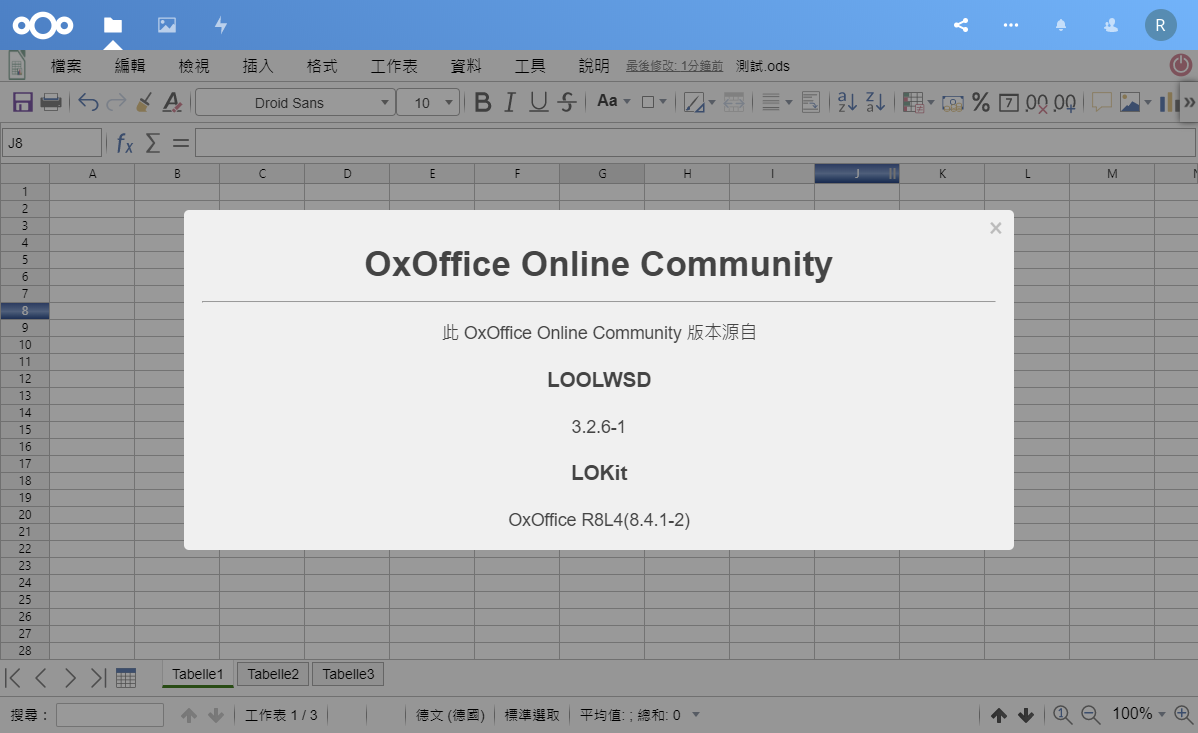
- 新增 Spreadsheet 檔
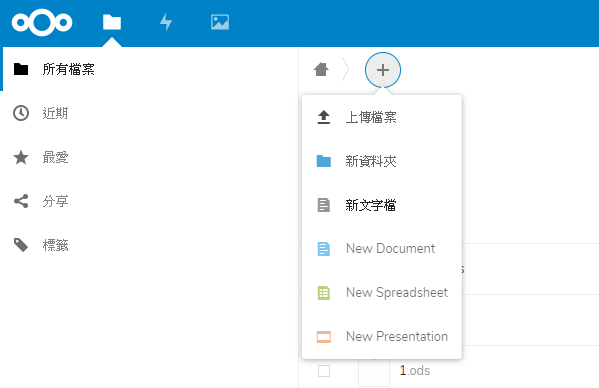
- 這就是線上版的 excel

- 關於 OxOffice