
PowerDNS 架設 - Debian
BUBU 因之前都是用 CentOS7 版本架設,但因 CentOS 系列已經沒有下個版本了,剛好 BUBU 現在目前的站台的服務都是用 Debian 系統來運行服務為主,因此此篇會重新改寫成 Debian 的操作流程。
111.07.21 安裝在 Debian 11、資料庫修改 10.8,改用資料庫複寫方式讓第二台 DNS 也會有記錄。
111.08.31 資料庫修改 10.9 版本。
112.02.03 資料庫修改 10.10 版本。
112.05.26 資料庫修改 10.11 版本。
112.09.04 系統更新至 Debian 12 、修改 PowerDNS-Admin 安裝方式及更新方式。
113.05.29 修改 PowerDNS 服務版本更新。
114.02.23 修改 PowerDNS 服務版本更新。
運行環境
環境都是在 「Proxmox VE 」 虛擬系統上架設,都是以 「 LXC 」模式為主,除非有特殊狀況會告知使用 「 VM 」 模式
- 系統環境: Debian 10、11、12
- Web 服務: Nginx 1.25
- 資料庫服務: MariaDB 10.11
資料庫
-
安裝 MaraiDB 程流可以參考本站編寫的文章 在 Debian 系統上安裝 MariaDB
-
設定 PowerDNS 資料庫權限
mariadb -u root -p登入資料庫裡設定資表及權限
CREATE DATABASE powerdns;
GRANT ALL ON powerdns.* TO 'powerdns'@'localhost' IDENTIFIED BY 'powerdns-password';
FLUSH PRIVILEGES;
增加 PowerDNS 必要的表單及欄位
官方 GitHub 有提供 .sql 資料表 官方載點
USE powerdns; #切換到 powerdns 資料表
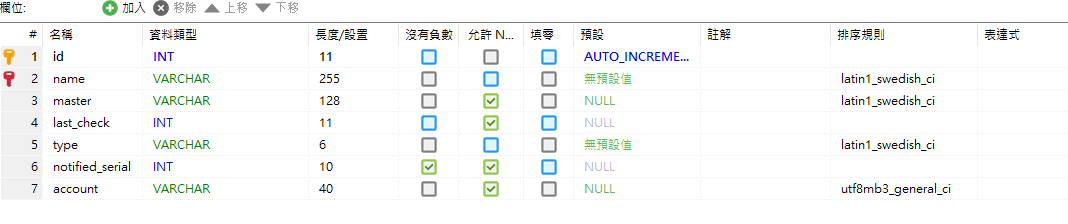
CREATE TABLE domains (
id INT AUTO_INCREMENT,
name VARCHAR(255) NOT NULL,
master VARCHAR(128) DEFAULT NULL,
last_check INT DEFAULT NULL,
type VARCHAR(8) NOT NULL,
notified_serial INT UNSIGNED DEFAULT NULL,
account VARCHAR(40) CHARACTER SET 'utf8' DEFAULT NULL,
options VARCHAR(64000) DEFAULT NULL,
catalog VARCHAR(255) DEFAULT NULL,
PRIMARY KEY (id)
) Engine=InnoDB CHARACTER SET 'latin1';
CREATE UNIQUE INDEX name_index ON domains(name);
CREATE INDEX catalog_idx ON domains(catalog);
CREATE TABLE records (
id BIGINT AUTO_INCREMENT,
domain_id INT DEFAULT NULL,
name VARCHAR(255) DEFAULT NULL,
type VARCHAR(10) DEFAULT NULL,
content VARCHAR(64000) DEFAULT NULL,
ttl INT DEFAULT NULL,
prio INT DEFAULT NULL,
disabled TINYINT(1) DEFAULT 0,
ordername VARCHAR(255) BINARY DEFAULT NULL,
auth TINYINT(1) DEFAULT 1,
PRIMARY KEY (id)
) Engine=InnoDB CHARACTER SET 'latin1';
CREATE INDEX nametype_index ON records(name,type);
CREATE INDEX domain_id ON records(domain_id);
CREATE INDEX ordername ON records (ordername);
CREATE TABLE supermasters (
ip VARCHAR(64) NOT NULL,
nameserver VARCHAR(255) NOT NULL,
account VARCHAR(40) CHARACTER SET 'utf8' NOT NULL,
PRIMARY KEY (ip, nameserver)
) Engine=InnoDB CHARACTER SET 'latin1';
CREATE TABLE comments (
id INT AUTO_INCREMENT,
domain_id INT NOT NULL,
name VARCHAR(255) NOT NULL,
type VARCHAR(10) NOT NULL,
modified_at INT NOT NULL,
account VARCHAR(40) CHARACTER SET 'utf8' DEFAULT NULL,
comment TEXT CHARACTER SET 'utf8' NOT NULL,
PRIMARY KEY (id)
) Engine=InnoDB CHARACTER SET 'latin1';
CREATE INDEX comments_name_type_idx ON comments (name, type);
CREATE INDEX comments_order_idx ON comments (domain_id, modified_at);
CREATE TABLE domainmetadata (
id INT AUTO_INCREMENT,
domain_id INT NOT NULL,
kind VARCHAR(32),
content TEXT,
PRIMARY KEY (id)
) Engine=InnoDB CHARACTER SET 'latin1';
CREATE INDEX domainmetadata_idx ON domainmetadata (domain_id, kind);
CREATE TABLE cryptokeys (
id INT AUTO_INCREMENT,
domain_id INT NOT NULL,
flags INT NOT NULL,
active BOOL,
published BOOL DEFAULT 1,
content TEXT,
PRIMARY KEY(id)
) Engine=InnoDB CHARACTER SET 'latin1';
CREATE INDEX domainidindex ON cryptokeys(domain_id);
CREATE TABLE tsigkeys (
id INT AUTO_INCREMENT,
name VARCHAR(255),
algorithm VARCHAR(50),
secret VARCHAR(255),
PRIMARY KEY (id)
) Engine=InnoDB CHARACTER SET 'latin1';
CREATE UNIQUE INDEX namealgoindex ON tsigkeys(name, algorithm);
開始安裝 PowerDNS 服務
官方各系統的 套件載點 BUBU 是使用 Debian 系統為服務,當下安裝的版本為 PowerDNS 穩定來源庫
-
新增加來源庫
vim /etc/apt/sources.list.d/pdns.list- Debain 11
# PowerDNS Authoritative Server - stable branch deb [signed-by=/etc/apt/keyrings/auth-49-pub.asc] http://repo.powerdns.com/debian bullseye-auth-49 main # PowerDNS Recursor - stable branch deb [signed-by=/etc/apt/keyrings/rec-52-pub.asc] http://repo.powerdns.com/debian bullseye-rec-52 main- Debain 12
# PowerDNS Authoritative Server - stable branch deb [signed-by=/etc/apt/keyrings/auth-49-pub.asc] http://repo.powerdns.com/debian bookworm-auth-49 main # PowerDNS Recursor - stable branch deb [signed-by=/etc/apt/keyrings/rec-52-pub.asc] http://repo.powerdns.com/debian bookworm-rec-52 main -
新增加
vim /etc/apt/preferences.d/auth-49
Package: auth*
Pin: origin repo.powerdns.com
Pin-Priority: 600
- 新增加
vim /etc/apt/preferences.d/rec-50
Package: rec*
Pin: origin repo.powerdns.com
Pin-Priority: 600
- 新增加 PowerDNS 來源庫的金鑰
sudo install -d /etc/apt/keyrings; curl https://repo.powerdns.com/FD380FBB-pub.asc | sudo tee /etc/apt/keyrings/auth-49-pub.asc && sudo install -d /etc/apt/keyrings; curl https://repo.powerdns.com/FD380FBB-pub.asc | sudo tee /etc/apt/keyrings/rec-52-pub.asc && sudo apt-get update
安裝完成之後系統會自動啟動各服務,啟動 PowerDNS Server 及 PowerDNS Recursor 啟動會失敗,因為兩個服務都在搶 Port 的關係造成的,所以等一下修改好服務的設定檔就可以正常啟用服務了。
在安裝 PowerDNS 服務之前要先把系統本的 systemd-resolved 這個服務先停用,因為此服務會跟 PowerDNS Recursor 反解服務 Port 會互搶
sudo systemctl disable systemd-resolved
sudo systemctl stop systemd-resolved
- 在安裝 PowerDNS 服務之前要先處理反解服務,所以我們要先安裝
PowerDNS Recursor服務
PowerDNS Recursor - master branch
sudo apt-get install pdns-recursor -y
PowerDNS Recursor 設定檔 這是負責遞迥查詢服務
- 備份預設檔,建立新的設定檔
mv /etc/powerdns/recursor.conf /etc/powerdns/recursor.conf.bak
vim /etc/powerdns/recursor.conf
- 以下是我比較會異動到的設定檔,如果還要增加設定,請參考預設檔複製過來即可
#################################
# api-key	Static pre-shared authentication key for access to the REST API
#
# api-key=
api-key=自行定義密碼

#################################
# webserver     Start a webserver (for REST API)
#
# webserver=no
webserver=yes

#################################
# webserver-port        Port of webserver to listen on
#
# webserver-port=8082
webserver-port=8082

#################################
# webserver-address     IP Address of webserver to listen on
#
# webserver-address=127.0.0.1
webserver-address=0.0.0.0

#################################
# webserver-allow-from  Webserver access is only allowed from these subnets
#
# webserver-allow-from=127.0.0.1,::1
webserver-allow-from=0.0.0.0/0

#################################
# allow-from	If set, only allow these comma separated netmasks to recurse
#
# allow-from=127.0.0.0/8, 10.0.0.0/8, 100.64.0.0/10, 169.254.0.0/16, 192.168.0.0/16, 172.16.0.0/12, ::1/128, fc00::/7, fe80::/10
#設定允許遞迥查詢內部網段
allow-from=127.0.0.1, 192.168.0.0/24

#################################
# forward-zones	Zones for which we forward queries, comma separated domain=ip pairs
#
# forward-zones=
#轉送查詢的網域與伺服器,格式是 網域=伺服器ip,多個網域以逗點分隔
forward-zones=.=127.0.0.1:54

#################################
# forward-zones-recurse Zones for which we forward queries with recursion bit, comma separated domain=ip pairs
#
# forward-zones-recurse=
#內部查詢不到會查到外部查詢
forward-zones-recurse=.=8.8.8.8, .=168.95.1.1

#################################
# local-address	IP addresses to listen on, separated by spaces or commas. Also accepts ports.
#
# local-address=127.0.0.1
local-address=0.0.0.0

#################################
# local-port	port to listen on
#
# local-port=53
local-port=53

#################################
# logging-facility      Facility to log messages as. 0 corresponds to local0
#
# logging-facility=
logging-facility=0

#################################
# max-negative-ttl      maximum number of seconds to keep a negative cached entry in memory
#
# max-negative-ttl=3600
max-negative-ttl=3600

#################################
# setgid        If set, change group id to this gid for more security
#
setgid=pdns

#################################
# setuid        If set, change user id to this uid for more security
#
setuid=pdns

#################################
# config-dir	Location of configuration directory (recursor.conf)
#
config-dir=/etc/powerdns

#################################
# hint-file	If set, load root hints from this file
#
# hint-file=
hint-file=/usr/share/dns/root.hints

#################################
# include-dir	Include *.conf files from this directory
#
# include-dir=
include-dir=/etc/powerdns/recursor.d

#################################
# lua-config-file	More powerful configuration options
#
lua-config-file=/etc/powerdns/recursor.lua

#################################
# quiet	Suppress logging of questions and answers
#
quiet=yes
- 設定自動啟動及重啟 PowerDNS-Recursor 服務
systemctl start pdns-recursor ; systemctl enable pdns-recursor
PowerDNS Authoritative Server - master branch
sudo apt-get install pdns-server pdns-backend-mysql -y
- 服務都安裝完之後開始設定兩個設定檔
PowerDNS 設定檔
- 備份預設檔,建立新的設定檔
mv /etc/powerdns/pdns.conf /etc/powerdns/pdns.conf.bak
vim /etc/powerdns/pdns.conf
- 以下是我比較會異動到的設定檔,如果還要增加設定,請參考預設檔複製過來即可
#################################
# api	Enable/disable the REST API (including HTTP listener)
#
# api=no
api=yes

#################################
# api-key	Static pre-shared authentication key for access to the REST API
#
# api-key=
api-key=自行定義密碼

#################################
# daemon	Operate as a daemon
#
daemon=yes

#################################
# guardian	Run within a guardian process
#
guardian=no

#################################
# include-dir	Include *.conf files from this directory
#
# include-dir=
include-dir=/etc/powerdns/pdns.d

#################################
# launch	Which backends to launch and order to query them in
#
# launch=\nlaunch=
#
launch=gmysql
gmysql-host=localhost
gmysql-user=powerdns
gmysql-password=powerdns-password
gmysql-dbname=powerdns
gmysql-dnssec=yes

#################################
# local-address	Local IP addresses to which we bind
#
# local-address=0.0.0.0
local-address=0.0.0.0

#################################
# local-port	The port on which we listen
#
# local-port=53
local-port=54

#################################
# log-dns-details	If PDNS should log DNS non-erroneous details
#
# log-dns-details=no
log-dns-details=yes

#################################
# log-dns-queries	If PDNS should log all incoming DNS queries
#
# log-dns-queries=no
log-dns-queries=yes

#################################
# log-timestamp	Print timestamps in log lines
#
# log-timestamp=yes
log-timestamp=yes

#################################
# logging-facility      Facility to log messages as. 0 corresponds to local0
#
# logging-facility=
logging-facility=0

#################################
# loglevel	Amount of logging. Higher is more. Do not set below 3
#
# loglevel=4
loglevel=4

#################################
# setgid        If set, change group id to this gid for more security
#
setgid=pdns

#################################
# setuid        If set, change user id to this uid for more security
#
setuid=pdns

#################################
# webserver	Start a webserver for monitoring (api=yes also enables the HTTP listener)
#
# webserver=no
webserver=yes

#################################
# webserver-address	IP Address of webserver/API to listen on
#
# webserver-address=127.0.0.1
webserver-address=0.0.0.0

#################################
# webserver-port	Port of webserver/API to listen on
#
# webserver-port=8081
webserver-port=8081

#################################
# webserver-allow-from	Webserver/API access is only allowed from these subnets
#
# webserver-allow-from=127.0.0.1,::1
webserver-allow-from=0.0.0.0/0

#################################
# query-logging Hint backends that queries should be logged
#
# query-logging=no
query-logging=yes
- 設定自動啟動及重啟 PowerDNS 服務
systemctl enable pdns ; systemctl restart pdns
PowerDNS-Admin 服務設定
- 安裝 requirements.txt 構建 Pythone 套件
sudo apt install -y libmariadb-dev libsasl2-dev libldap2-dev libssl-dev libxml2-dev libxslt1-dev libxmlsec1-dev libffi-dev pkg-config apt-transport-https virtualenv build-essential python3-venv libpq-dev python3-dev
因官方是使用 MySql 服務,所以有說明套件 libmysqlclient-dev 會因您使用的資料庫服務會不一樣這點要注意一下。那本篇所使用的資料是 MariadDB 所以是改用資料庫的專屬套件
-
安裝 Nodejs
- 舊版安裝方式
curl -sL https://deb.nodesource.com/setup_14.x | bash - apt install -y nodejs- 新版安裝方式
- 匯入 Nodejs 金鑰
sudo apt-get update sudo apt-get install -y ca-certificates curl gnupg sudo mkdir -p /etc/apt/keyrings curl -fsSL https://deb.nodesource.com/gpgkey/nodesource-repo.gpg.key | sudo gpg --dearmor -o /etc/apt/keyrings/nodesource.gpg- 新增加 Nodejs 來源庫,
NODE-MAJOR可以指定安裝版號。
NODE_MAJOR=20 echo "deb [signed-by=/etc/apt/keyrings/nodesource.gpg] https://deb.nodesource.com/node_$NODE_MAJOR.x nodistro main" | sudo tee /etc/apt/sources.list.d/nodesource.list -
安裝 Yarn
curl -sL https://dl.yarnpkg.com/debian/pubkey.gpg | gpg --dearmor | sudo tee /usr/share/keyrings/yarnkey.gpg >/dev/null
echo "deb [signed-by=/usr/share/keyrings/yarnkey.gpg] https://dl.yarnpkg.com/debian stable main" | sudo tee /etc/apt/sources.list.d/yarn.list
sudo apt update && sudo apt install -y yarn
安裝 PowerDNS-Admin
- 設定 PowerDNS 的 API
api=yes
api-key=your-powerdns-api-key
webserver=yes
- PowerDNS-Admin 建立資料庫
mariadb -u root -p   # 登入資料庫裡設定資表及權限

CREATE DATABASE powerdnsadmin CHARACTER SET utf8mb4 COLLATE utf8mb4_unicode_ci;
GRANT ALL PRIVILEGES ON powerdnsadmin.* TO 'pdnsadminuser'@'%' IDENTIFIED BY 'p4ssw0rd';
FLUSH PRIVILEGES;
quit;
- 安裝 PowerDNS-Admin
git clone https://github.com/PowerDNS-Admin/PowerDNS-Admin.git /opt/web/powerdns-admin
cd /opt/web/powerdns-admin
python3 -m venv ./venv
- 在執行
python3 -mvenv ./venv這一行指令會報出需要額外安裝python3-venv訊息如下
The virtual environment was not created successfully because ensurepip is not
available.  On Debian/Ubuntu systems, you need to install the python3-venv
package using the following command.

    apt-get install python3-venv

You may need to use sudo with that command.  After installing the python3-venv
package, recreate your virtual environment.

Failing command: ['/opt/web/powerdns-admin/venv/bin/python3', '-Im', 'ensurepip', '--upgrade', '--default-pip']
- 安裝
python3-venv
apt-get install python3-venv -y
- 進入 Python 模式並且開始安裝
source ./venv/bin/activate
pip install --upgrade pip
pip install -r requirements.txt
如果您的系統是安裝 Debian 12 版的的話在讀取安裝套件時會卡此套件 PyYAML 官方預計安裝版本是 5.4 版需修改成 6.0.1 版這樣子才能安裝成功
- 修改安裝套件版本
vim requirements.txt
# 修改前
PyYAML==5.4
# 修改後
PyYAML==6.0.1
- 複製一個新的設定檔
cp /opt/web/powerdns-admin/configs/development.py /opt/web/powerdns-admin/configs/production.py
- 安裝完之後設定 PowerDNS-Admin 設定檔
vim /opt/web/powerdns-admin/configs/production.py
- 修改設定檔如下
SECRET_KEY = 'We are the world' 在瀏覽器中對cookie進行簽名
BIND_ADDRESS = '127.0.0.1' 修改成 0.0.0.0 允許所有可以連線
PORT = 9191

SQLA_DB_USER = 'pdnsadminuser'
SQLA_DB_PASSWORD = 'powerdns-password'
SQLA_DB_HOST = '127.0.0.1'
SQLA_DB_PORT = 3306
SQLA_DB_NAME = 'powerdnsadmin'
SQLALCHEMY_TRACK_MODIFICATIONS = True
設定完存檔,並且開始安裝服務
- 讀取設定檔
export FLASK_CONF=../configs/production.py
- 運行下面指令自動建立 PowerDNS-Admin 資料庫裡的表單及欄位
export FLASK_APP=powerdnsadmin/__init__.py
flask db upgrade
- 產生資料檔
yarn install --pure-lockfile
flask assets build
- 運行 PowerDNS-Admin 服務
./run.py
- 安裝完之後開始瀏灠器輸入
http://dns主機ip:9191如果看到登入畫面表示您已安裝成功了可以使用了
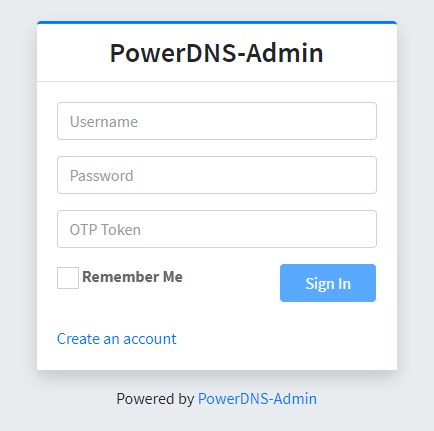
- 剛安裝完成官方並沒有預計任何的帳號,所以需要手動自行去建立帳號跟密碼輸入完之後就可以登入了
-
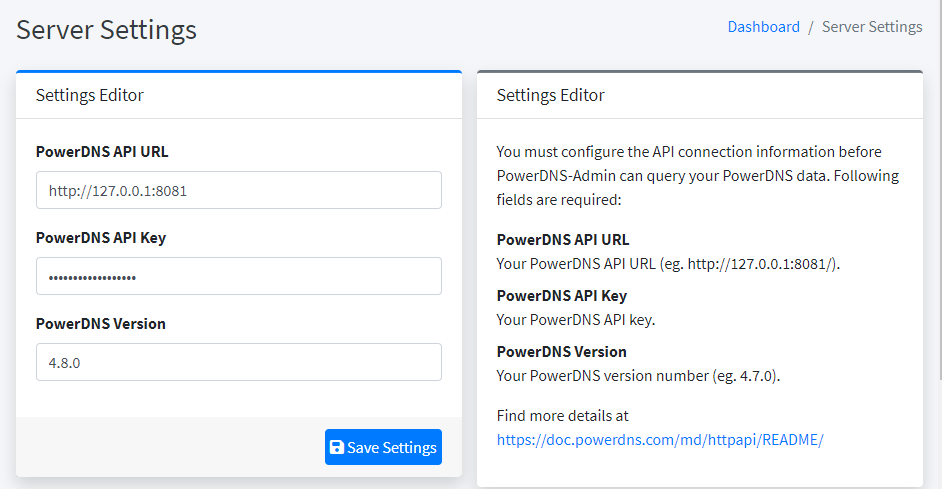
登入後會看到此頁面,要開輸入跟 PowerDNS 連接的 API
- API :http://127.0.0.1:8081
- API-kye:輸入當時所設定的密碼
- PDNS:輸入當時安裝的版本
- PowerDNS 版本查詢:
pdns_control version
-
設定完之後按下
Save Settings就可以了
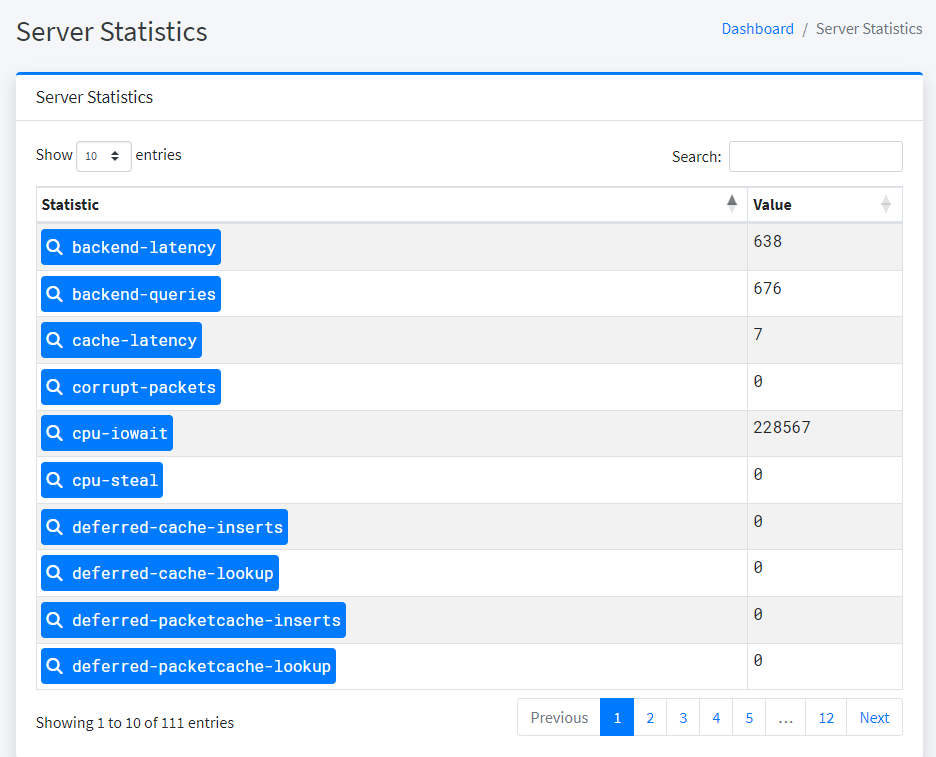
- 如果設定成功的話在
Server Statistics選項裡面就可以看到Server Statistics目前狀態,如圖下
- 如果設定成功的話在
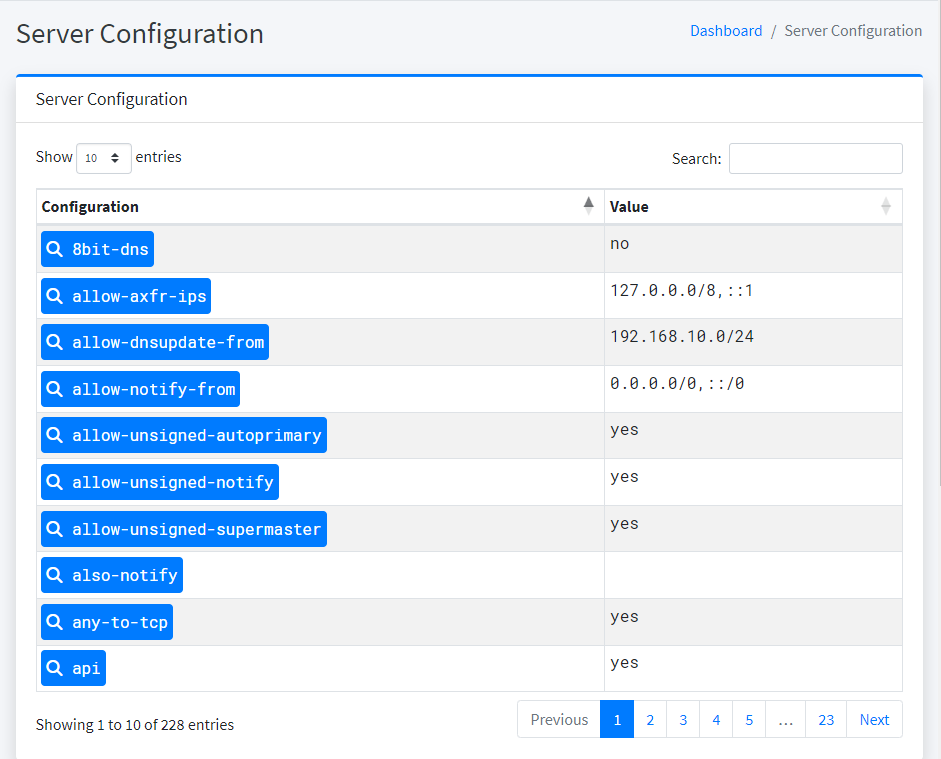
Server Configuration選項裡面就可以看到Server Configuration目前設定狀態,如圖下
-
如果設定失敗的話,在
Server Statistics、Server Configuration這兩個選項參數及數值就無法顯示出來,這有可能是 api 的資訊有誤,跟版本或者密碼輸入有訊。 -
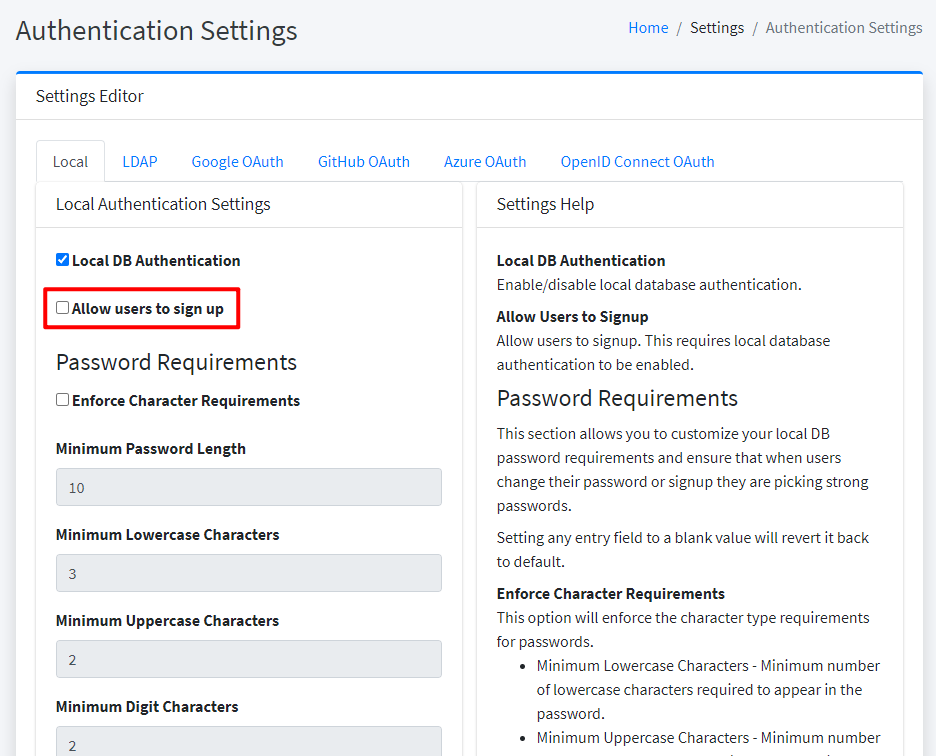
再來進到設定裡面把預設可以讓使用者註冊給取消掉,把
Allow users to sign up這個打勾給拿掉就可以了
- 離開 Python 虛擬環境
deactivate
但是這樣子使用上並不方便,服務都需要手動去啟用,所以官方建議還需要寫個服務來啟用,並且搭配網頁服務來使用。
- 新增
powerdns-admin服務設定檔vim /etc/systemd/system/powerdns-admin.service
[Unit]
Description=PowerDNS-Admin
Requires=powerdns-admin.socket
After=network.target

[Service]
PIDFile=/run/powerdns-admin/pid
User=pdns
Group=pdns
WorkingDirectory=/opt/web/powerdns-admin
ExecStart=/opt/web/powerdns-admin/venv/bin/gunicorn --pid /run/powerdns-admin/pid --bind unix:/run/powerdns-admin/socket 'powerdnsadmin:create_app()'
ExecReload=/bin/kill -s HUP $MAINPID
ExecStop=/bin/kill -s TERM $MAINPID
PrivateTmp=true

[Install]
WantedBy=multi-user.target
- 編輯 systemctl 設定檔讓系統載入 Powerdns-Admin 設定
sudo systemctl edit powerdns-admin.service新增加以下參數
[Service]
Environment="FLASK_CONF=../configs/production.py"
- 新增
powerdns-admin.socket設定檔vim /etc/systemd/system/powerdns-admin.socket
[Unit]
Description=PowerDNS-Admin socket

[Socket]
ListenStream=/run/powerdns-admin/socket

[Install]
WantedBy=sockets.target
- 新增 powerdns-admin.conf 設定檔
vim /etc/tmpfiles.d/powerdns-admin.conf
d /run/powerdns-admin 0755 pdns pdns -
- 啟動服務
sudo systemctl daemon-reload && sudo systemctl start powerdns-admin.socket && sudo systemctl enable powerdns-admin.socket
- 修改
powerdns-admin目錄權限
sudo chown -R pdns:pdns /run/powerdns-admin
sudo chown -R pdns:pdns /opt/web/powerdns-admin
sudo systemctl restart powerdns-admin
web服務
- 安裝 nginx 服務
# 安裝必要套件
sudo apt install curl gnupg2 ca-certificates lsb-release debian-archive-keyring

# 導入官方金鑰來確認該套件安全性
curl https://nginx.org/keys/nginx_signing.key | gpg --dearmor \
    | sudo tee /usr/share/keyrings/nginx-archive-keyring.gpg >/dev/null

# 驗證現在的金鑰是否正確
gpg --dry-run --quiet --import --import-options import-show /usr/share/keyrings/nginx-archive-keyring.gpg

# 輸出的指紋如下 573BFD6B3D8FBC641079A6ABABF5BD827BD9BF62
pub   rsa2048 2011-08-19 [SC] [expires: 2024-06-14]
      573BFD6B3D8FBC641079A6ABABF5BD827BD9BF62
uid                      nginx signing key <[email protected]>

# 來源庫新增加主線 nginx 服務
echo "deb [signed-by=/usr/share/keyrings/nginx-archive-keyring.gpg] \
http://nginx.org/packages/mainline/debian `lsb_release -cs` nginx" \
    | sudo tee /etc/apt/sources.list.d/nginx.list

# 安裝 nginx 服務
sudo apt update
sudo apt install nginx -y

# 啟動及自動啟動服務
systemctl start nginx ; systemctl enable nginx
- Nginx 設定檔
server {
  listen *:80;
  server_name               powerdns-admin.local www.powerdns-admin.local;

  index                     index.html index.htm index.php;
  root                      /opt/web/powerdns-admin;
  access_log                /var/log/nginx/powerdns-admin.local.access.log combined;
  error_log                 /var/log/nginx/powerdns-admin.local.error.log;

  client_max_body_size              10m;
  client_body_buffer_size           128k;
  proxy_redirect                    off;
  proxy_connect_timeout             90;
  proxy_send_timeout                90;
  proxy_read_timeout                90;
  proxy_buffers                     32 4k;
  proxy_buffer_size                 8k;
  proxy_set_header                  Host $host;
  proxy_set_header                  X-Real-IP $remote_addr;
  proxy_set_header                  X-Forwarded-For $proxy_add_x_forwarded_for;
  proxy_headers_hash_bucket_size    64;

  location ~ ^/static/  {
    include  /etc/nginx/mime.types;
    root /opt/web/powerdns-admin/powerdnsadmin;

    location ~*  \.(jpg|jpeg|png|gif)$ {
      expires 365d;
    }

    location ~* ^.+.(css|js)$ {
      expires 7d;
    }
  }

  location / {
    proxy_pass            http://unix:/run/powerdns-admin/socket;
    proxy_read_timeout    120;
    proxy_connect_timeout 120;
    proxy_redirect        off;
  }

}
PowerDNS Log 記錄
因官方預設是關閉的,所要手動去啟用
systemctl edit --full pdns

看到 ExecStart 這一行將裡面的 --disable-syslog 刪除掉

去到 vim /etc/rsyslog.conf 增加給 PowerDNS 使用
local0.info                       -/var/log/pdns.info
local0.warn                       -/var/log/pdns.warn
local0.err                        /var/log/pdns.err

再去將 pdns.conf 及 recursor.conf 這兩個設定檔
修變這一行 logging-facility=0

以上修改完之後整個系統都重啟,就可以在 log 資料夾裡面看到這三個檔案
PowerDNS 支援 Active Directory 網域服務
PowerDNS 有支援動態更新 DNS 服務,在建置 AD 服務可以考慮將 DNS 設定指向 PowerDNS 服務來使用,修改 PowerDNS 配置文件使其支持动态更新。
vim /etc/pdns/pdns.conf

################################
# allow-dnsupdate-from  A global setting to allow DNS updates from these IP ranges.
#
# allow-dnsupdate-from=127.0.0.0/8,::1
allow-dnsupdate-from=127.0.0.0/8

#################################
# dnsupdate     Enable/Disable DNS update (RFC2136) support. Default is no.
#
# dnsupdate=no
dnsupdate=yes
- 添加修改解析記錄
@	SOA	Active	3600	ns.adtest.com. ns.adtest.com. 2017112802 10800 3600 604800 3600
_kerberos._tcp	SRV	Active	3600	0 0 88 ad.adtest.com.
_kerberos._tcp.dc._msdcs	SRV	Active	3600	0 0 88 ad.adtest.com.
_ldap._tcp	SRV	Active	3600	0 0 389 ad.adtest.com.
_ldap._tcp.dc._msdcs	SRV	Active	3600	0 0 389 ad.adtest.com.
ad	A	Active	3600	192.168.50.207
ns	A	Active	3600	192.168.50.237
- PowerDNS-Admin 允許通過 DynDNS 更新需創建記錄域名面板中,進入需要修改的域名
Admin設定,在DynDNS 2 Settings勾選Allow on-demand creation of records via DynDNS updates?
更新 PowerDNS-Admin
- 先備份整個
powerdns-admin整個目錄,備份完之後再重新安裝一次流程cd /opt/web/
mv powerdns-admin powerdns-admin-bak
- 下載新版的
powerdns-admin
git clone https://github.com/ngoduykhanh/PowerDNS-Admin.git /opt/web/powerdns-admin
cd /opt/web/powerdns-admin
python3 -mvenv ./venv
- 進入 Python 模式並重新安裝
source ./venv/bin/activate
pip install --upgrade pip
pip install -r requirements.txt
- 再從備份檔裡面的還原
default_config.py這個設定檔,還原前先把原本的設定檔先備份起來再還原(之前舊版本的設定位置),未來更新的話設定檔位置在configs該目錄。
cp ../powerdns-admin-bak/powerdnsadmin/default_config.py configs/production.py
- 設定要載入的設定檔位置
export FLASK_CONF=../configs/production.py
- 還原完之後繼續執行
export FLASK_APP=powerdnsadmin/__init__.py
flask db upgrade
- 產生資料檔
yarn install --pure-lockfile
flask assets build
- 確認沒有問題再將該目錄的權限修改
chown -R pdns:pdns /opt/web/powerdns-admin
- 重啟服務
systemctl restart powerdns-admin
反解設定
-
如果您有使用到反解服務的話在,並且對外公開的話
-
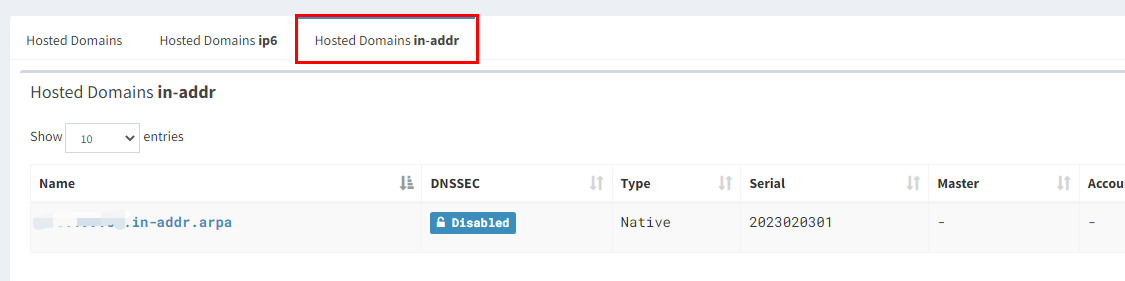
在 PowerDNS-Admin 管理介面上新增加要反解的 IP
123.123.123.in-addr.arpa
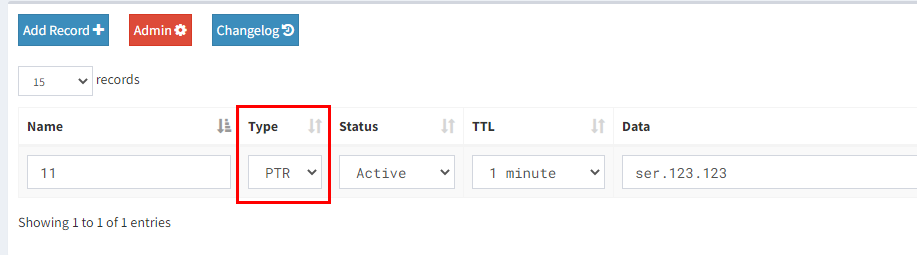
- 新增加剛後在儀表面介面上選擇圖片中紅色框框就就可以看到您剛剛新增好要反解名稱
- 新增加您所要反解的 IP 及名稱,記得在 type 要選擇
PTR
- 新增完後在設定
PowerDNS Recursor設定檔
vim /etc/powerdns/recursor.conf

#################################
# allow-from	If set, only allow these comma separated netmasks to recurse
#
# allow-from=127.0.0.0/8, 10.0.0.0/8, 100.64.0.0/10, 169.254.0.0/16, 192.168.0.0/16, 172.16.0.0/12, ::1/128, fc00::/7, fe80::/10
#設定允許遞迥查詢網段
allow-from=0.0.0.0/0

#################################
# forward-zones	Zones for which we forward queries, comma separated domain=ip pairs
#
# forward-zones=
#轉送查詢的網域與伺服器,格式是 網域=伺服器ip,多個網域以逗點分隔
forward-zones=.=127.0.0.1:54 , 123.123.123.123.in-addr.arpa.=127.0.0.1:54 # 設定自管對外公開的 IP
- 重啟 recursor 服務
systemctl restart pdns-recursor
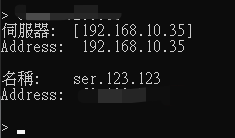
- 在用
nslookup確認是否有正常反解出該 IP 所指定的名稱。
參考資料來源
設定 master/slave
如果不想使用資料庫複寫機制也可以使用設定檔的方式做操作
- 設定
vim /etc/hosts
11.111.1.1 ns1.example.local
11.111.1.2 ns2.example.local
- 設定 master
vim /etc/powerdns/pdns.conf
# 允許 slave 來查詢變更
allow-axfr-ips=11.111.1.2/32
master=yes
daemon=yes
guardian=yes
also-notify=11.111.1.2
# 通知、axfr 時間
slave-cycle-interval=60
disable-axfr=no
default-soa-name=ns1.example.local
- 設定 slave
vim /etc/powerdns/pdns.conf
slave=yes
allow-notify-from=11.111.1.1/32
slave-cycle-interval=60
default-soa-name=ns2.example.local
- 以上如果都設定完之後記得要重啟服務
systemctl restart pdns
- 在資料庫設定
suprmaster此表單
#INSERT INTO supermasters VALUES ('<your masters IP address>', '<your slaves hostname>', '');
INSERT INTO supermasters ('11.111.1.1', 'ns2.example.local', account) VALUES ('10.0.0.1', 'ns2.example.org', '');
備註-1
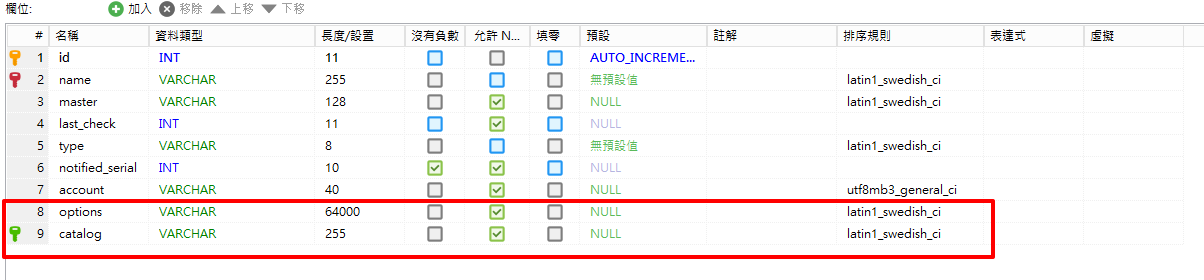
BUBU 在更新 PowerDNS 服務後發現到管理介面無法進去做 DNS 設定會跳 500 訊息。那去 PowerDNS-Admin GitHub 剛好有人詢問此問題,是說資料庫有缺少的表單,是 gmysqlbackend 模組在用表單只要修改此表單就可以正常設定了
- 用
./run.py來查看失敗訊息,附上圖片

- 連到進資料到修改 powserdns 資料庫 4.3.0_to_4.7.0_schema.mysql.sql
ALTER TABLE domains ADD options VARCHAR(64000) DEFAULT NULL;
ALTER TABLE domains ADD catalog VARCHAR(255) DEFAULT NULL;
ALTER TABLE domains MODIFY type VARCHAR(8) NOT NULL;

CREATE INDEX catalog_idx ON domains(catalog);
- 修改前
- 修改後
參考相關網頁
備註-2
BUBU 在更新 PowerDNS 服務剛好官方所提供來源庫的 key 已過程,剛好在官方 GitHub 有人反應此問題,那以下剛好有人提供決解方式,BUBU 測試後是可以正常更新服務的
- 輸入以下的指令
apt-key adv --refresh-keys --keyserver keyserver.ubuntu.com
參考相關網頁
參考相關網頁
- PowerDNS 官方載點
- Install PowerDNS and PowerDNS-Admin on Ubuntu 20.04|18.04 & Debian 10|9
- 搭建一套权威 DNS 服务架构
- PowerDNS-Admin 官方
- PowerDNS Master Slave DNS Replication with MySQL backend
- powerdns 架构更新说明
- CÀI ĐẶT POWERDNS VÀ POWERDNS ADMIN TRÊN UBUNTU 20.04
- Utiliser Powerdns comme serveur DNS
- Upgrade procedure for wik
- PowerDNS支持的模式
- PowerDNS-Admin 官方設定 Nginx 文檔
- PowerDNS-Admin 官方安裝文檔